
Infrastructure hardening: Cheap, effortless backups
Part of my series on hardening your personal infrastructure. A guide for Windows and MacOS.
Introduction
The best antidote to fear is having a plan. Let’s make a plan for what would happen to your files if your house burned down. We want to be as certain as anything can be in life that no matter what happens, your files cannot be lost.
I used to use a product called CrashPlan for my backups. Then one day CrashPlan decided the market for home backups wasn’t profitable anymore and they were working exclusively with businesses now. I researched a bunch of alternatives, and today I will share that research with you.
As I searched for a better backup system, I had three main requirements in mind:
- Effortless operation. A backup plan that requires you to perform a chore every so often is no backup plan at all, because at some point your life will get busy, the least urgent thing (backups) will get neglected, and that will be when disaster strikes. You want something that will run 100% on automatic.
- Versioned backups. Gone are the days when a virus would be content to erase your hard drive. These days we have ransomware, which encrypts your files so you can’t open them, lurks insidiously for weeks or months, and then demands thousands of dollars in exchange for the decryption key. If you only have one backup copy, and you back up the encrypted files, your backups are worthless. To defend against ransomware, your backup system needs to maintain several versions so you can be assured of having a good one.
- Low cost. Backups aren’t that complicated. This is an important service, and we want it done right, but whatever the monthly bill is, we’re going to be spending that money every month forever. Let’s get the bill as low as we can.
This wasn’t on my original requirements list, but the solution I found had a fourth benefit: Independence. The most important pieces of this system will be owned by us. Someday another company will send us an email that says “I am altering the deal.” When that day comes, we will say, “Fine. See ya!”, kick them to the curb, and switch to another provider in minutes. That kind of freedom is what hardened infrastructure is all about.
My backup system has three components:
- The files. These live on the computers in my home. We don’t need writeable CDs, external hard drives, or anything like that.
- The backup software. This is the program that monitors the files on your hard drive and backs them up for you. I used to use something called Arq for this; it was pretty good, but it cost $50. While researching this blog post I found Duplicati, which does the same job with a nicer interface while also being free and open-source. I’m impressed.
- Cheap cloud storage. Duplicati can backup your stuff to an extra hard drive, but for sure protection against fire, flood, or meteor strike, nothing’s as good as cloud storage. If you supply your own backup software, Backblaze B2 will store all your files at the rate of half a cent per gigabyte per month. My family spends about $4/month on backups. That’s better than any other deal I’ve seen. Importantly, Backblaze has competition; we can switch to a different cloud storage provider (like Dropbox, OneDrive, or Amazon S3) with the flip of a switch.
“Now hold on!” you say. “I thought the goal of these posts was reducing dependence on the cloud!” Reducing dependence on the cloud is a goal, subservient to the larger goal of making our electronics tougher and more independent. What we really want to avoid is an all-in-one solution that’s run by somebody else. Those are very convenient right up until they screw you. What we’re doing here is using a cloud provider as one easily-replaceable part in a system we build and control.
Think about the difference between a smartphone and a desktop PC. Smartphones are usually very polished experiences; every part of them is vetted to work with every other part, and there’s not much that can go wrong. But if something does go seriously wrong, most phone components can’t be repaired or swapped out; typically you have to replace the whole thing.
Compare that to a desktop PC. PCs crash sometimes, and they can be harder to understand. That’s because there’s more to understand – you can do a lot more on a PC than you can on a phone. And if part of your PC fails, or you want something better, you can buy a new part and slot it in for much cheaper than the price of a new PC. I’ve been upgrading my computer a piece at a time for ten years now; in that time I’ve gone through more phones than I can remember. And the upgrades are usually seamless, whereas getting a new phone is a hassle.
When you set up an important system that you plan to use for a long time, like a backup system, durability is important. Avoid solutions that promise to “do it all,” “leave it to us,” “we’ll take care of you forever” – unless you think that company will keep its promises that long. Build it like a PC. Use interchangeable parts that are easily replaced. The more of the system you own and control, the fewer opportunities there are for companies to charge you rent and break your heart.
Setting up Backblaze
Backblaze is the company that’s going to store our files; start by creating an account with them. You get 10 gigabytes of free storage to start you out.
Make a Bucket
Once you have your account, you need to make a bucket. A bucket is just a container to hold a bunch of files in; I recommend creating one for each computer you need to back up. Go to the buckets screen and click “Create a bucket”.
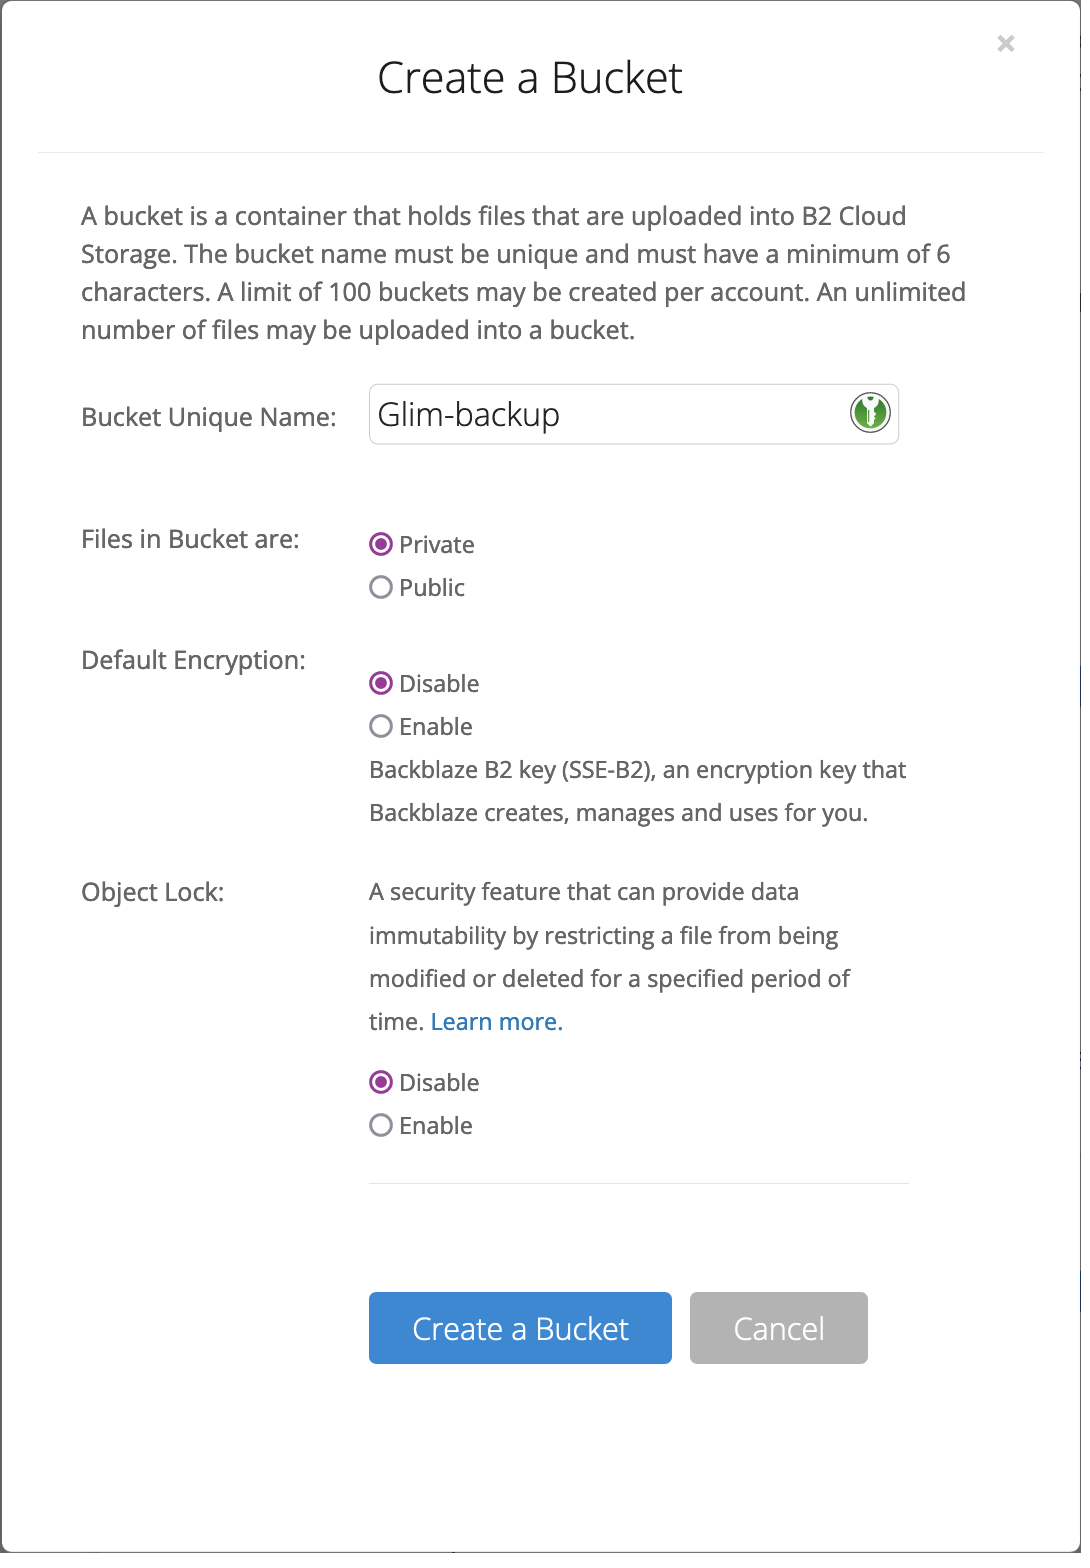
Your bucket needs a name; I recommend naming it after your computer. What’s that? Your computer doesn’t have a name? Well, why not? Assuming you plan to have more than one computer over the course of your life, you will need to uniquely identify each one to your backup software. A name like “HP Laptop #2” is going to become confusing at some point. My recommendation: think about your computer’s traits, then think of a character (either real-life or from fiction) that reminds you of those traits. For example, my Macbook is attractive, powerful, and wants to make all of my decisions for me, so I named it after Starlight Glimmer from Friendship is Magic. Think of a name. Any name. Then put it in the Bucket Name field.
All of the other defaults are fine. You don’t need Backblaze to encrypt the data because we’re going to do it on our end; that way there’s no possibility of anyone reading our backups. Click “Create a Bucket”.
Make an Application Key
You have a bucket; now you need an application key. This is a security credential that Duplicati needs to access your account. Click “App keys” on the left.
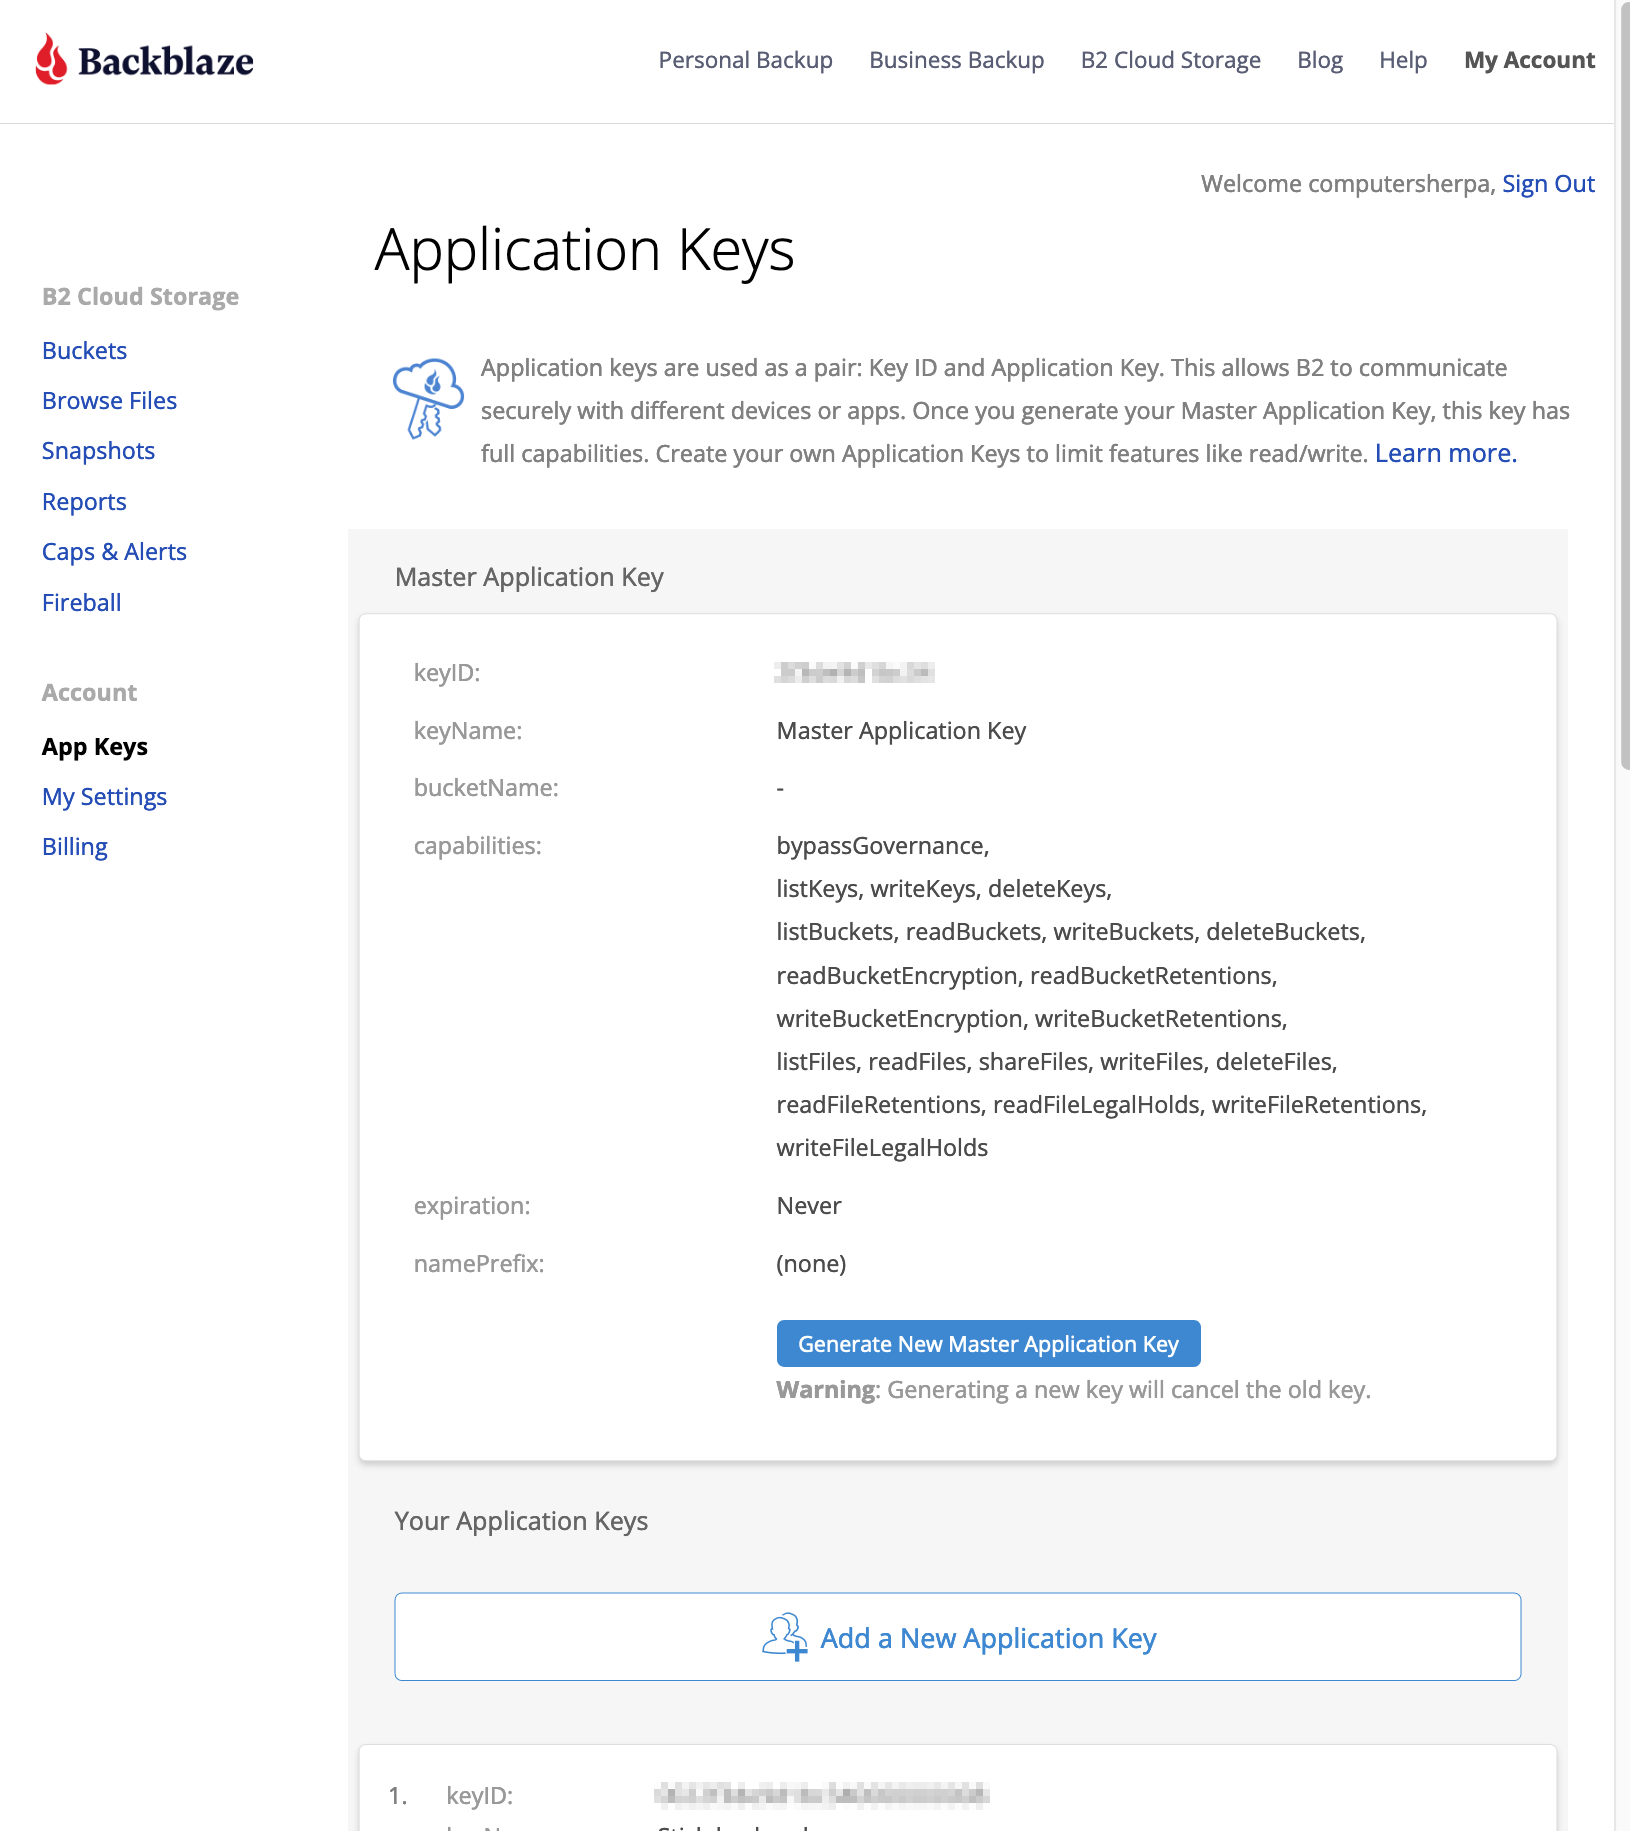
At the top of the screen there’s something called “Master Application Key”. You don’t want that one; that’s a skeleton key for your whole account. A general principle of good computer security is not to give any program more permissions that it needs; we want each computer to just have access to its own bucket. Click “Add a New Application Key”.
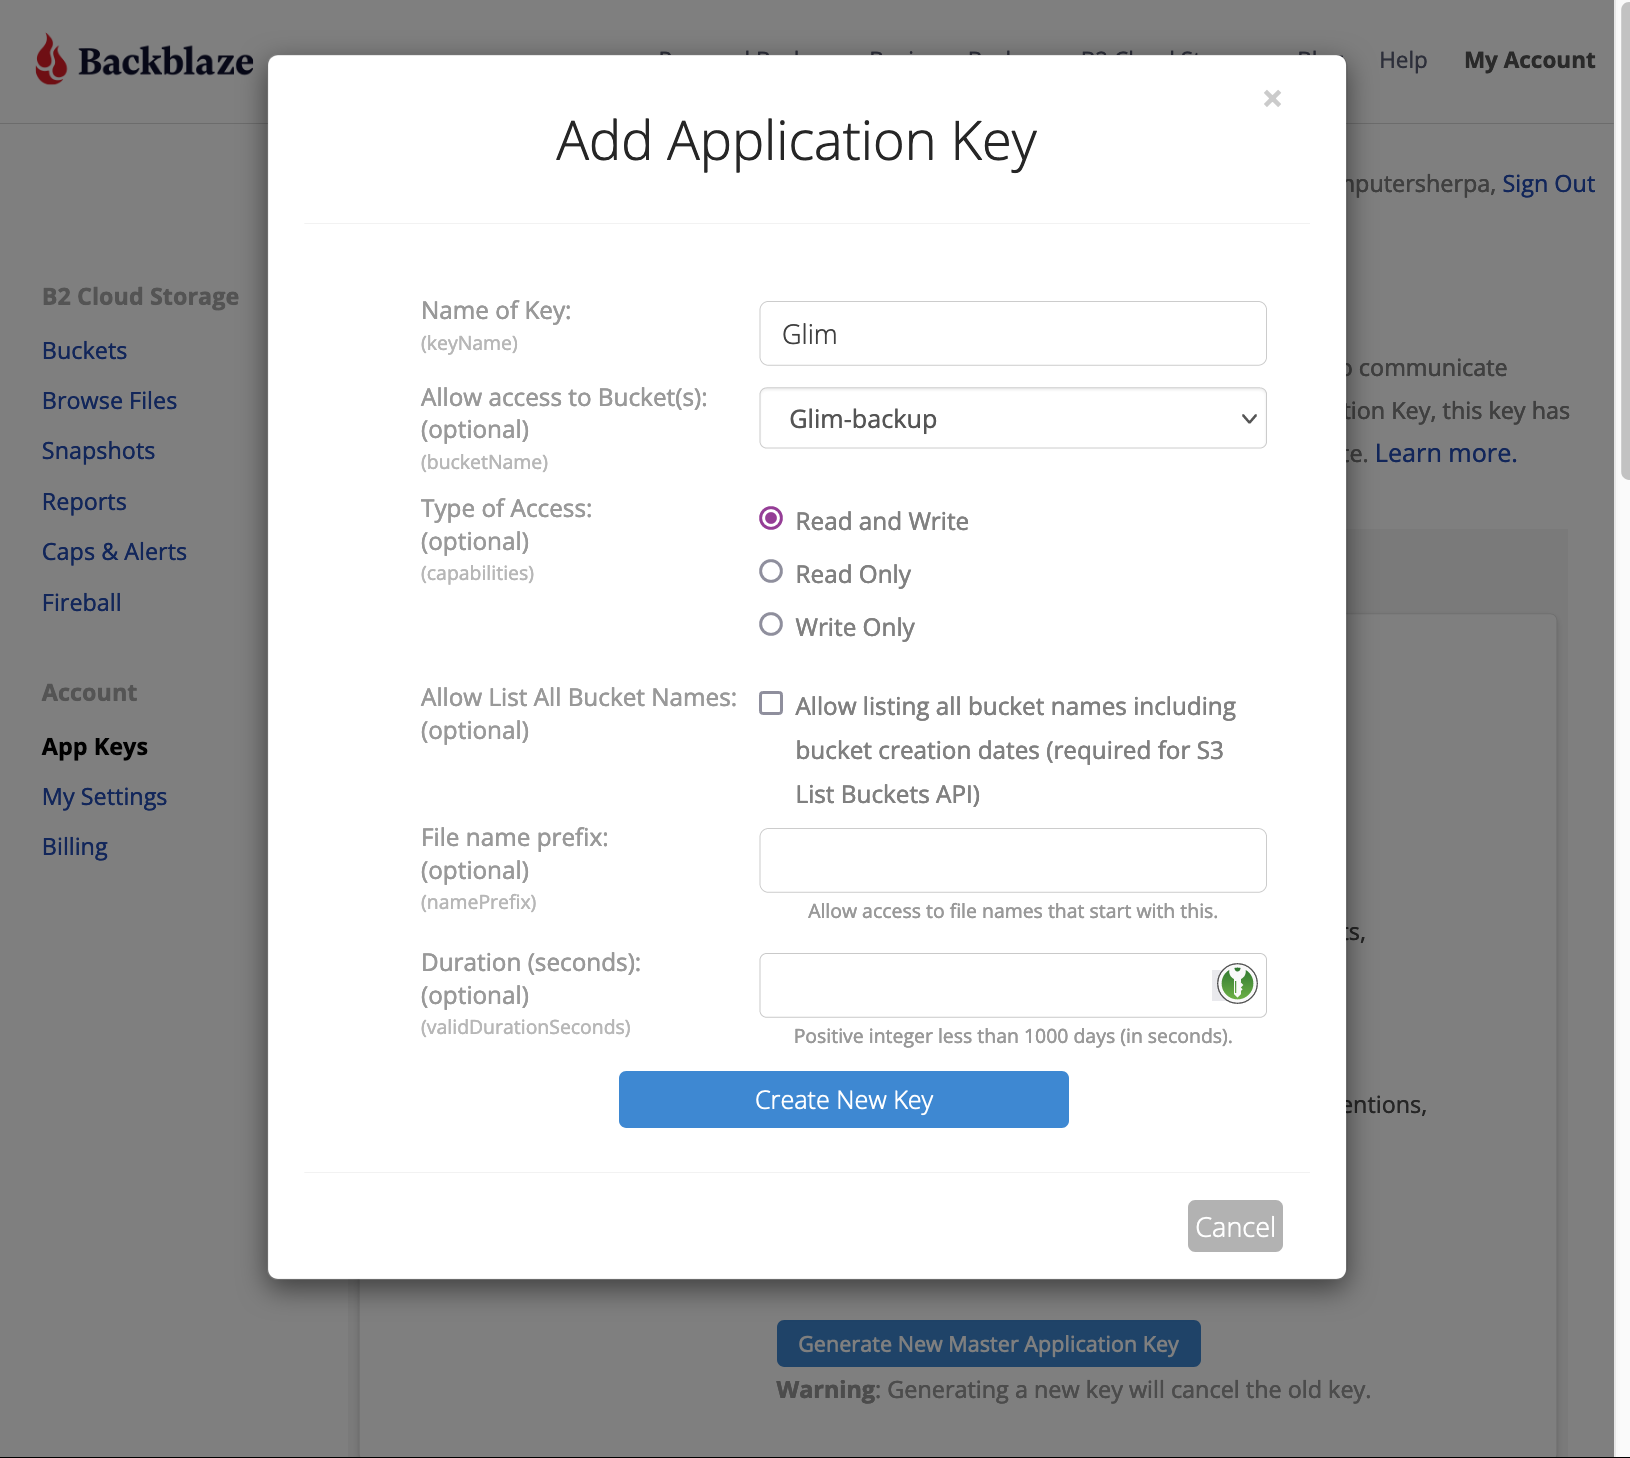
Name the key after the computer it’s backing up. There’s a dropdown menu asking which buckets the key should grant access to; select the bucket you just created. All of the other defaults are fine. Click “Create New Key”.
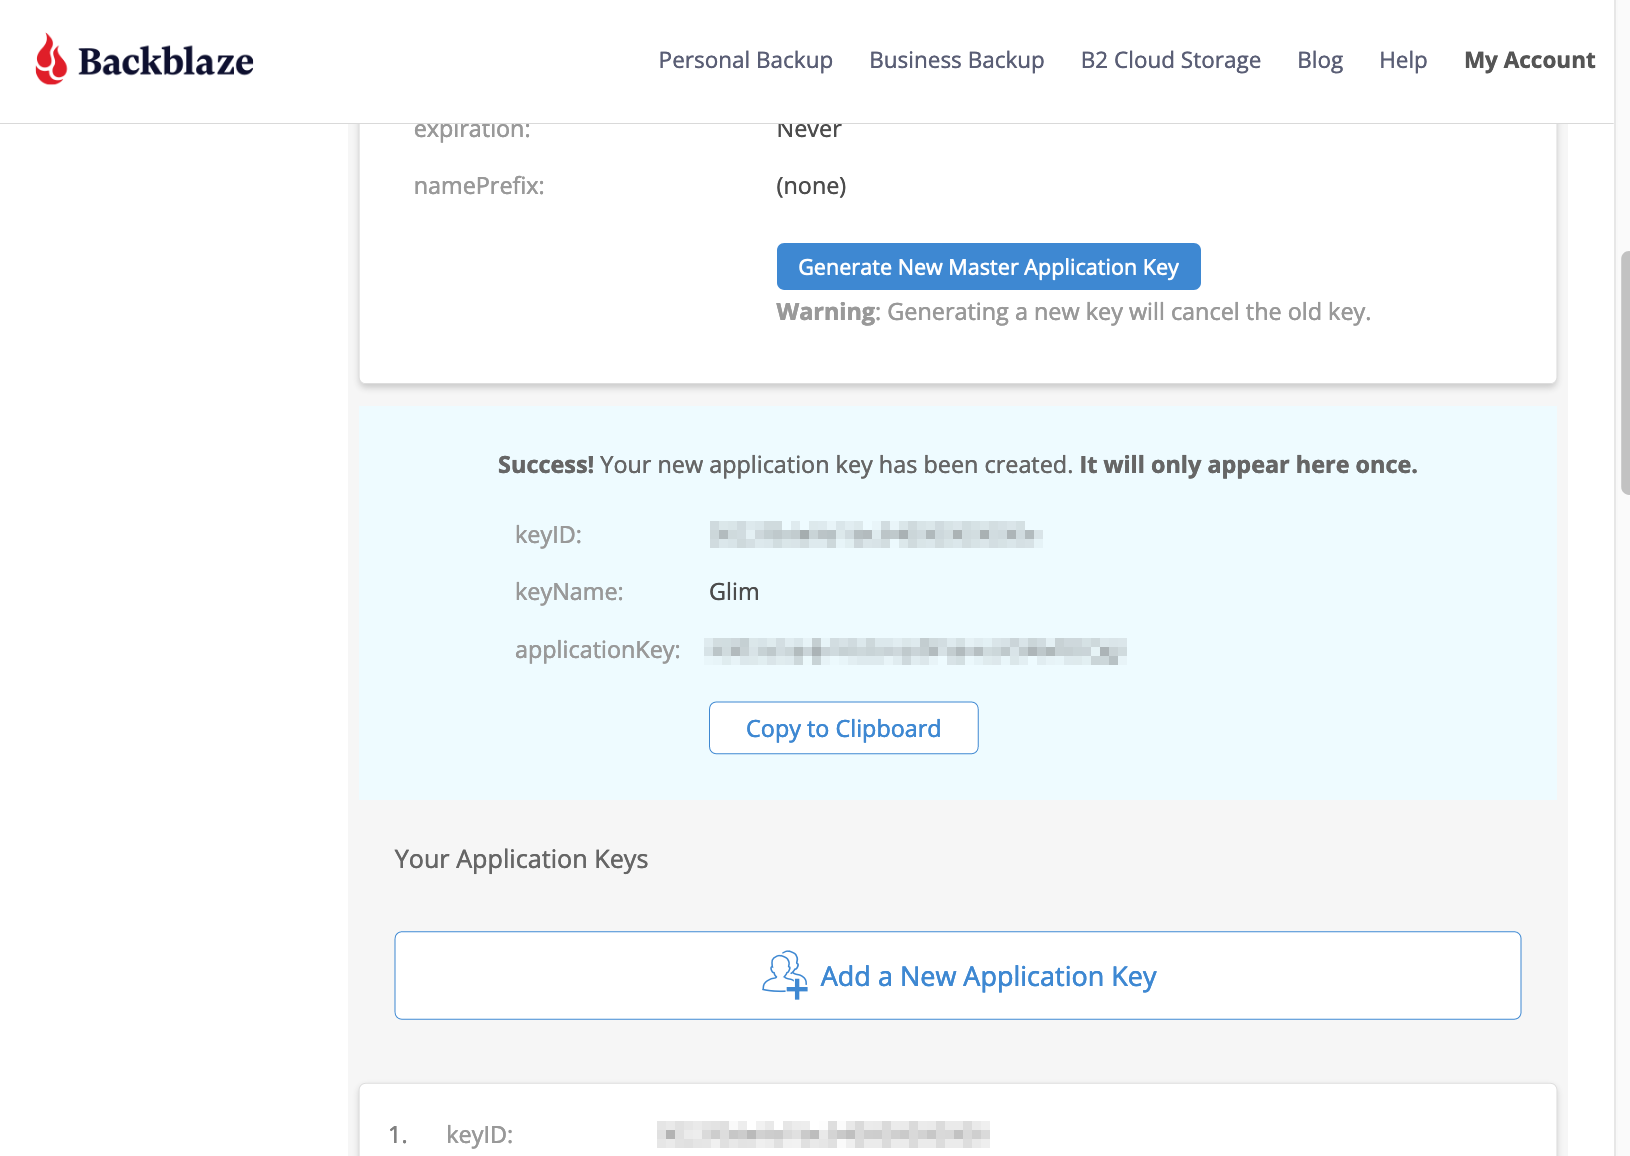
Now you have an application key. This has three pieces:
- the keyName, which is just a nickname for your convenience
- the keyID, which is basically a username
- and the applicationKey, which is basically a password.
Copy and paste these somewhere convenient, like an empty text file - we’re going to need them once we’ve set up Duplicati. If you have a password vault, that would be an excellent place to put them.
For security reasons, Backblaze will only show you this application key this one time – but it’s always easy to make a new one. Just follow the steps above.
Bucket, check. Key, check. Backblaze is all set; now it’s time to set up Duplicati.
Setting up Duplicati
Download Duplicati from here. If you’re on Mac, you’ll also need to download the Mono framework; click the gray button for the Stable channel, not the blue one. (The Mono framework is something that helps programmers write software that works across Windows, Mac, and Linux more easily.)
Once Duplicati is installed, open it. Click “Add backup”, then “Next”.
Step 1: General backup settings
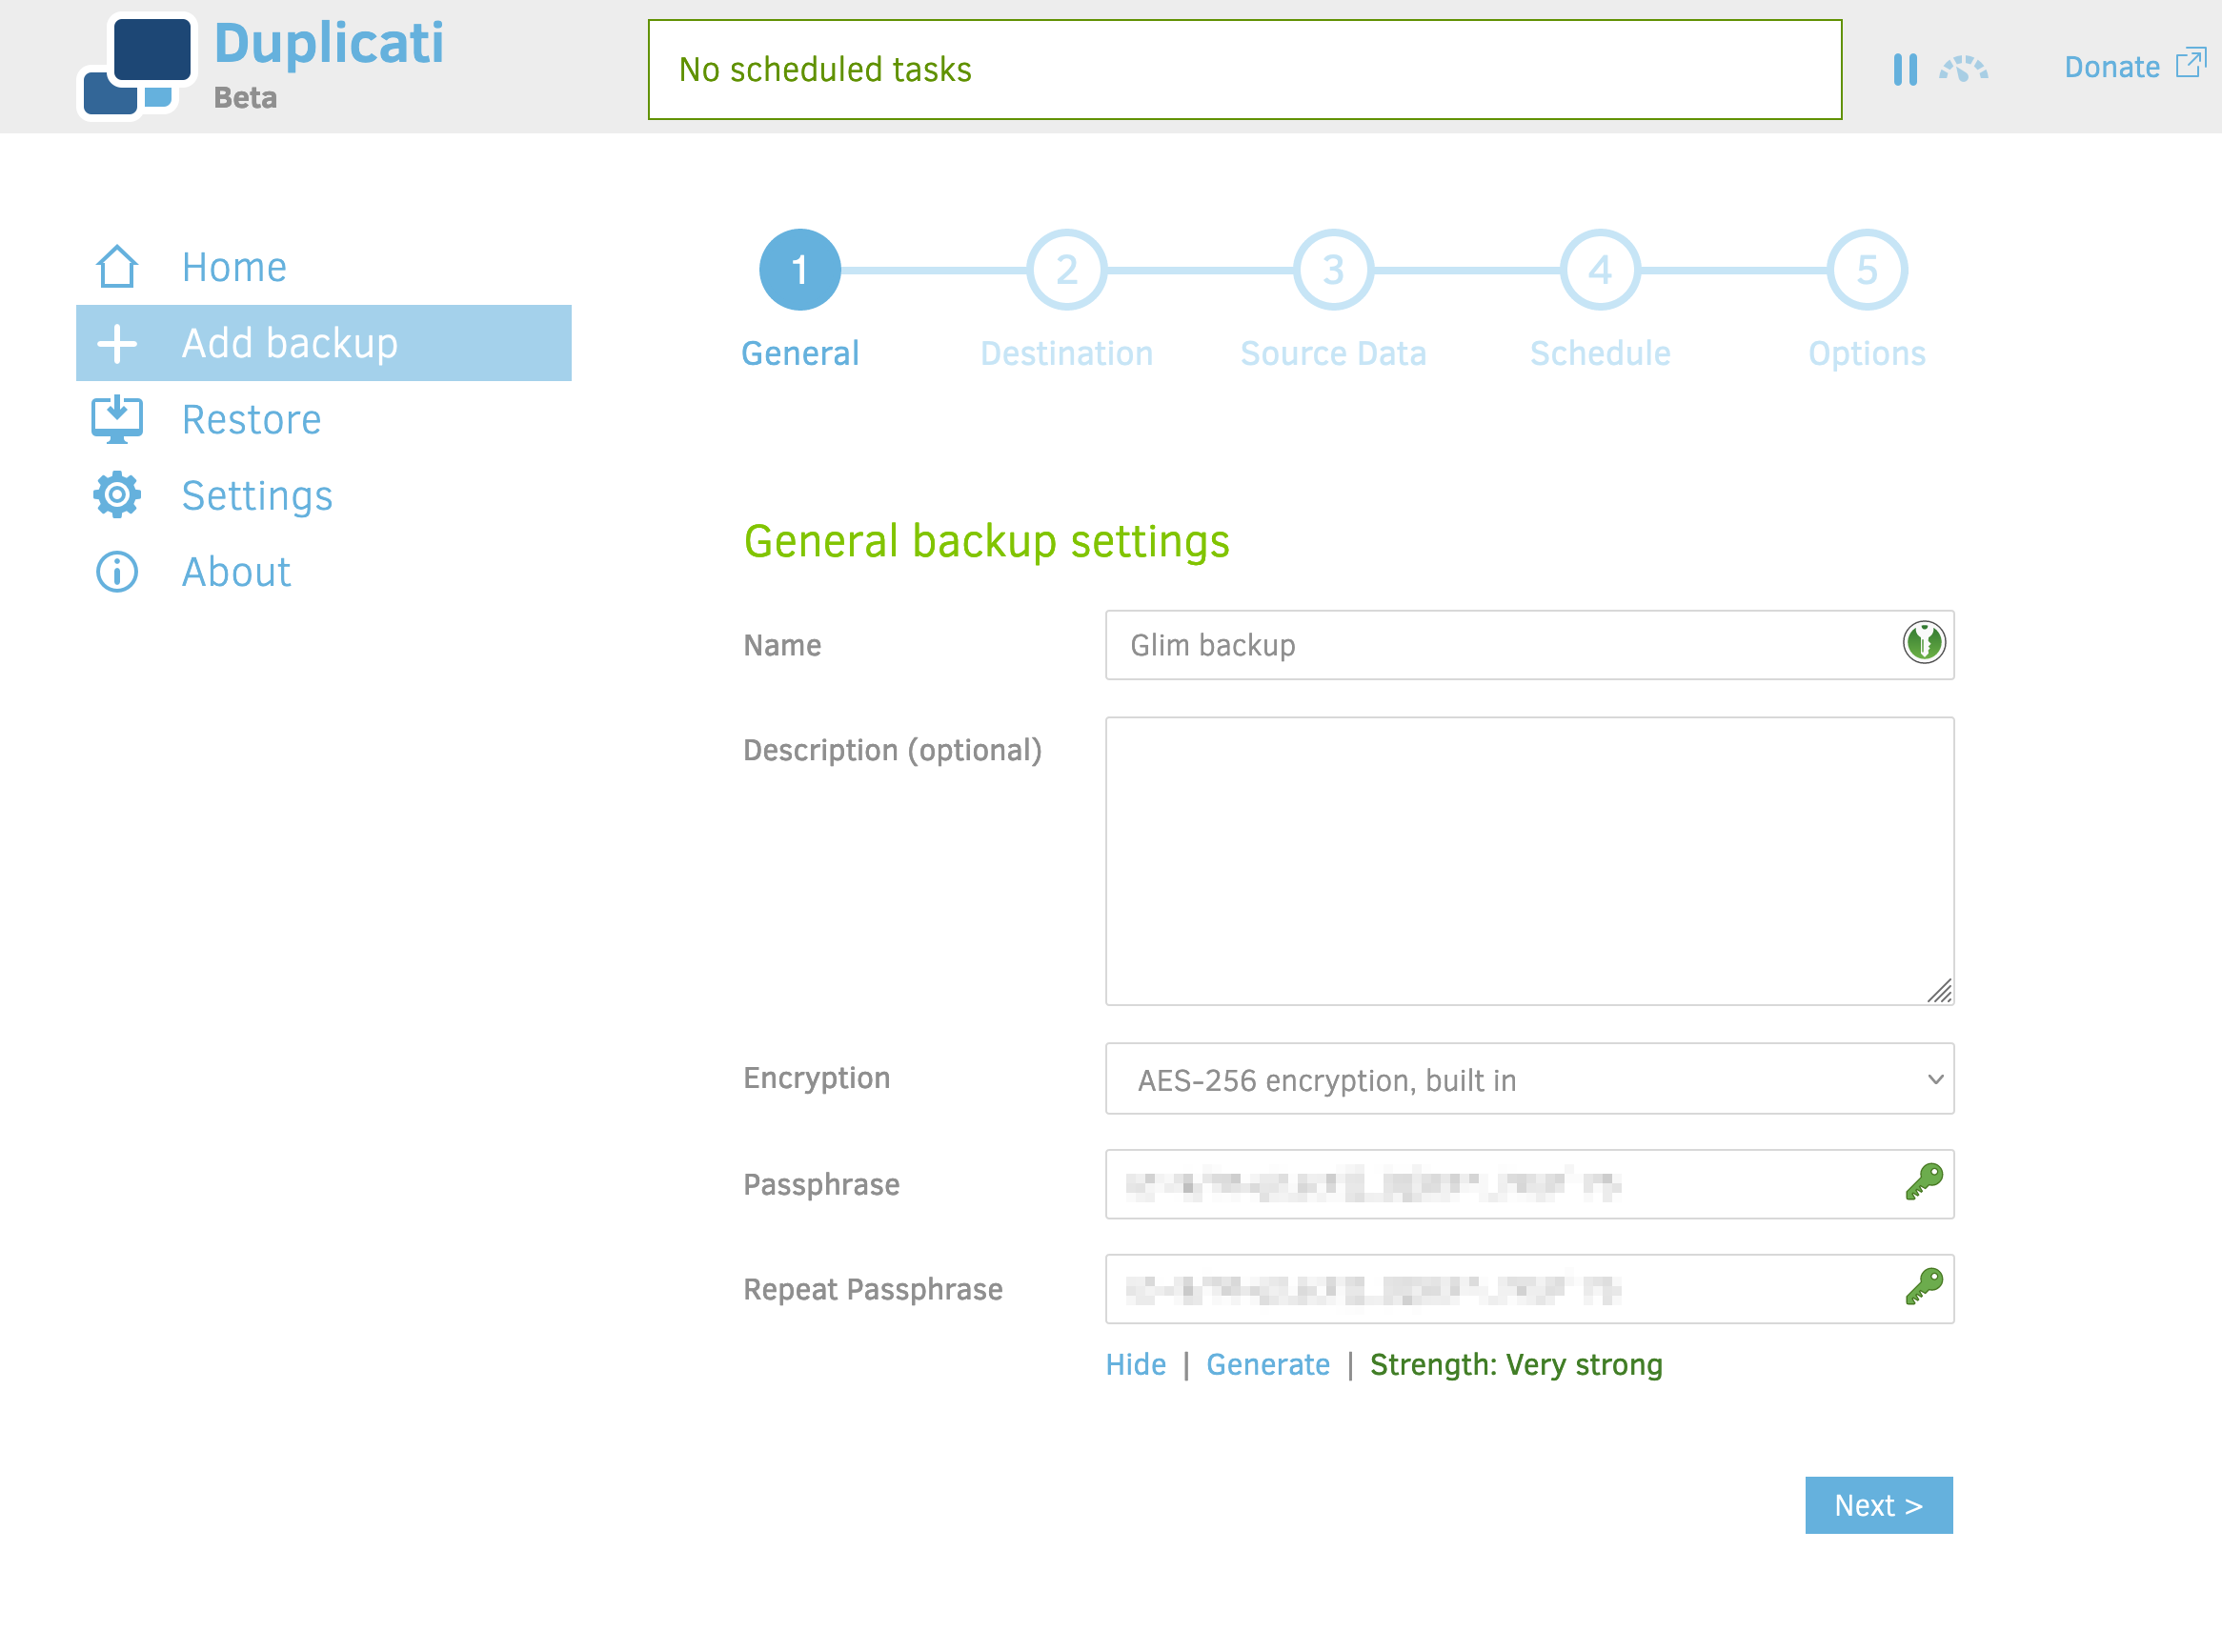
Name your backup job after your computer, same as you did with the application key. Encryption should be set to “AES-256, built in”; this is extremely strong military-grade encryption. Click “Generate” to create a password.
This password is extremely important. If you ever lose this password, your backups are useless. Not only should you save this in your password vault, you should also write it down on a piece of paper and keep it in your important files. Put the password to your Backblaze account on the paper too, while you’re at it.
Got your password squared away? Good. Click Next.
Step 2: Destination
This is where we teach Duplicati to talk to Backblaze.
First, open the “Storage type” dropdown. Duplicati can send files to a lot of places; look in the “Proprietary” section and select “B2 Cloud Storage”.
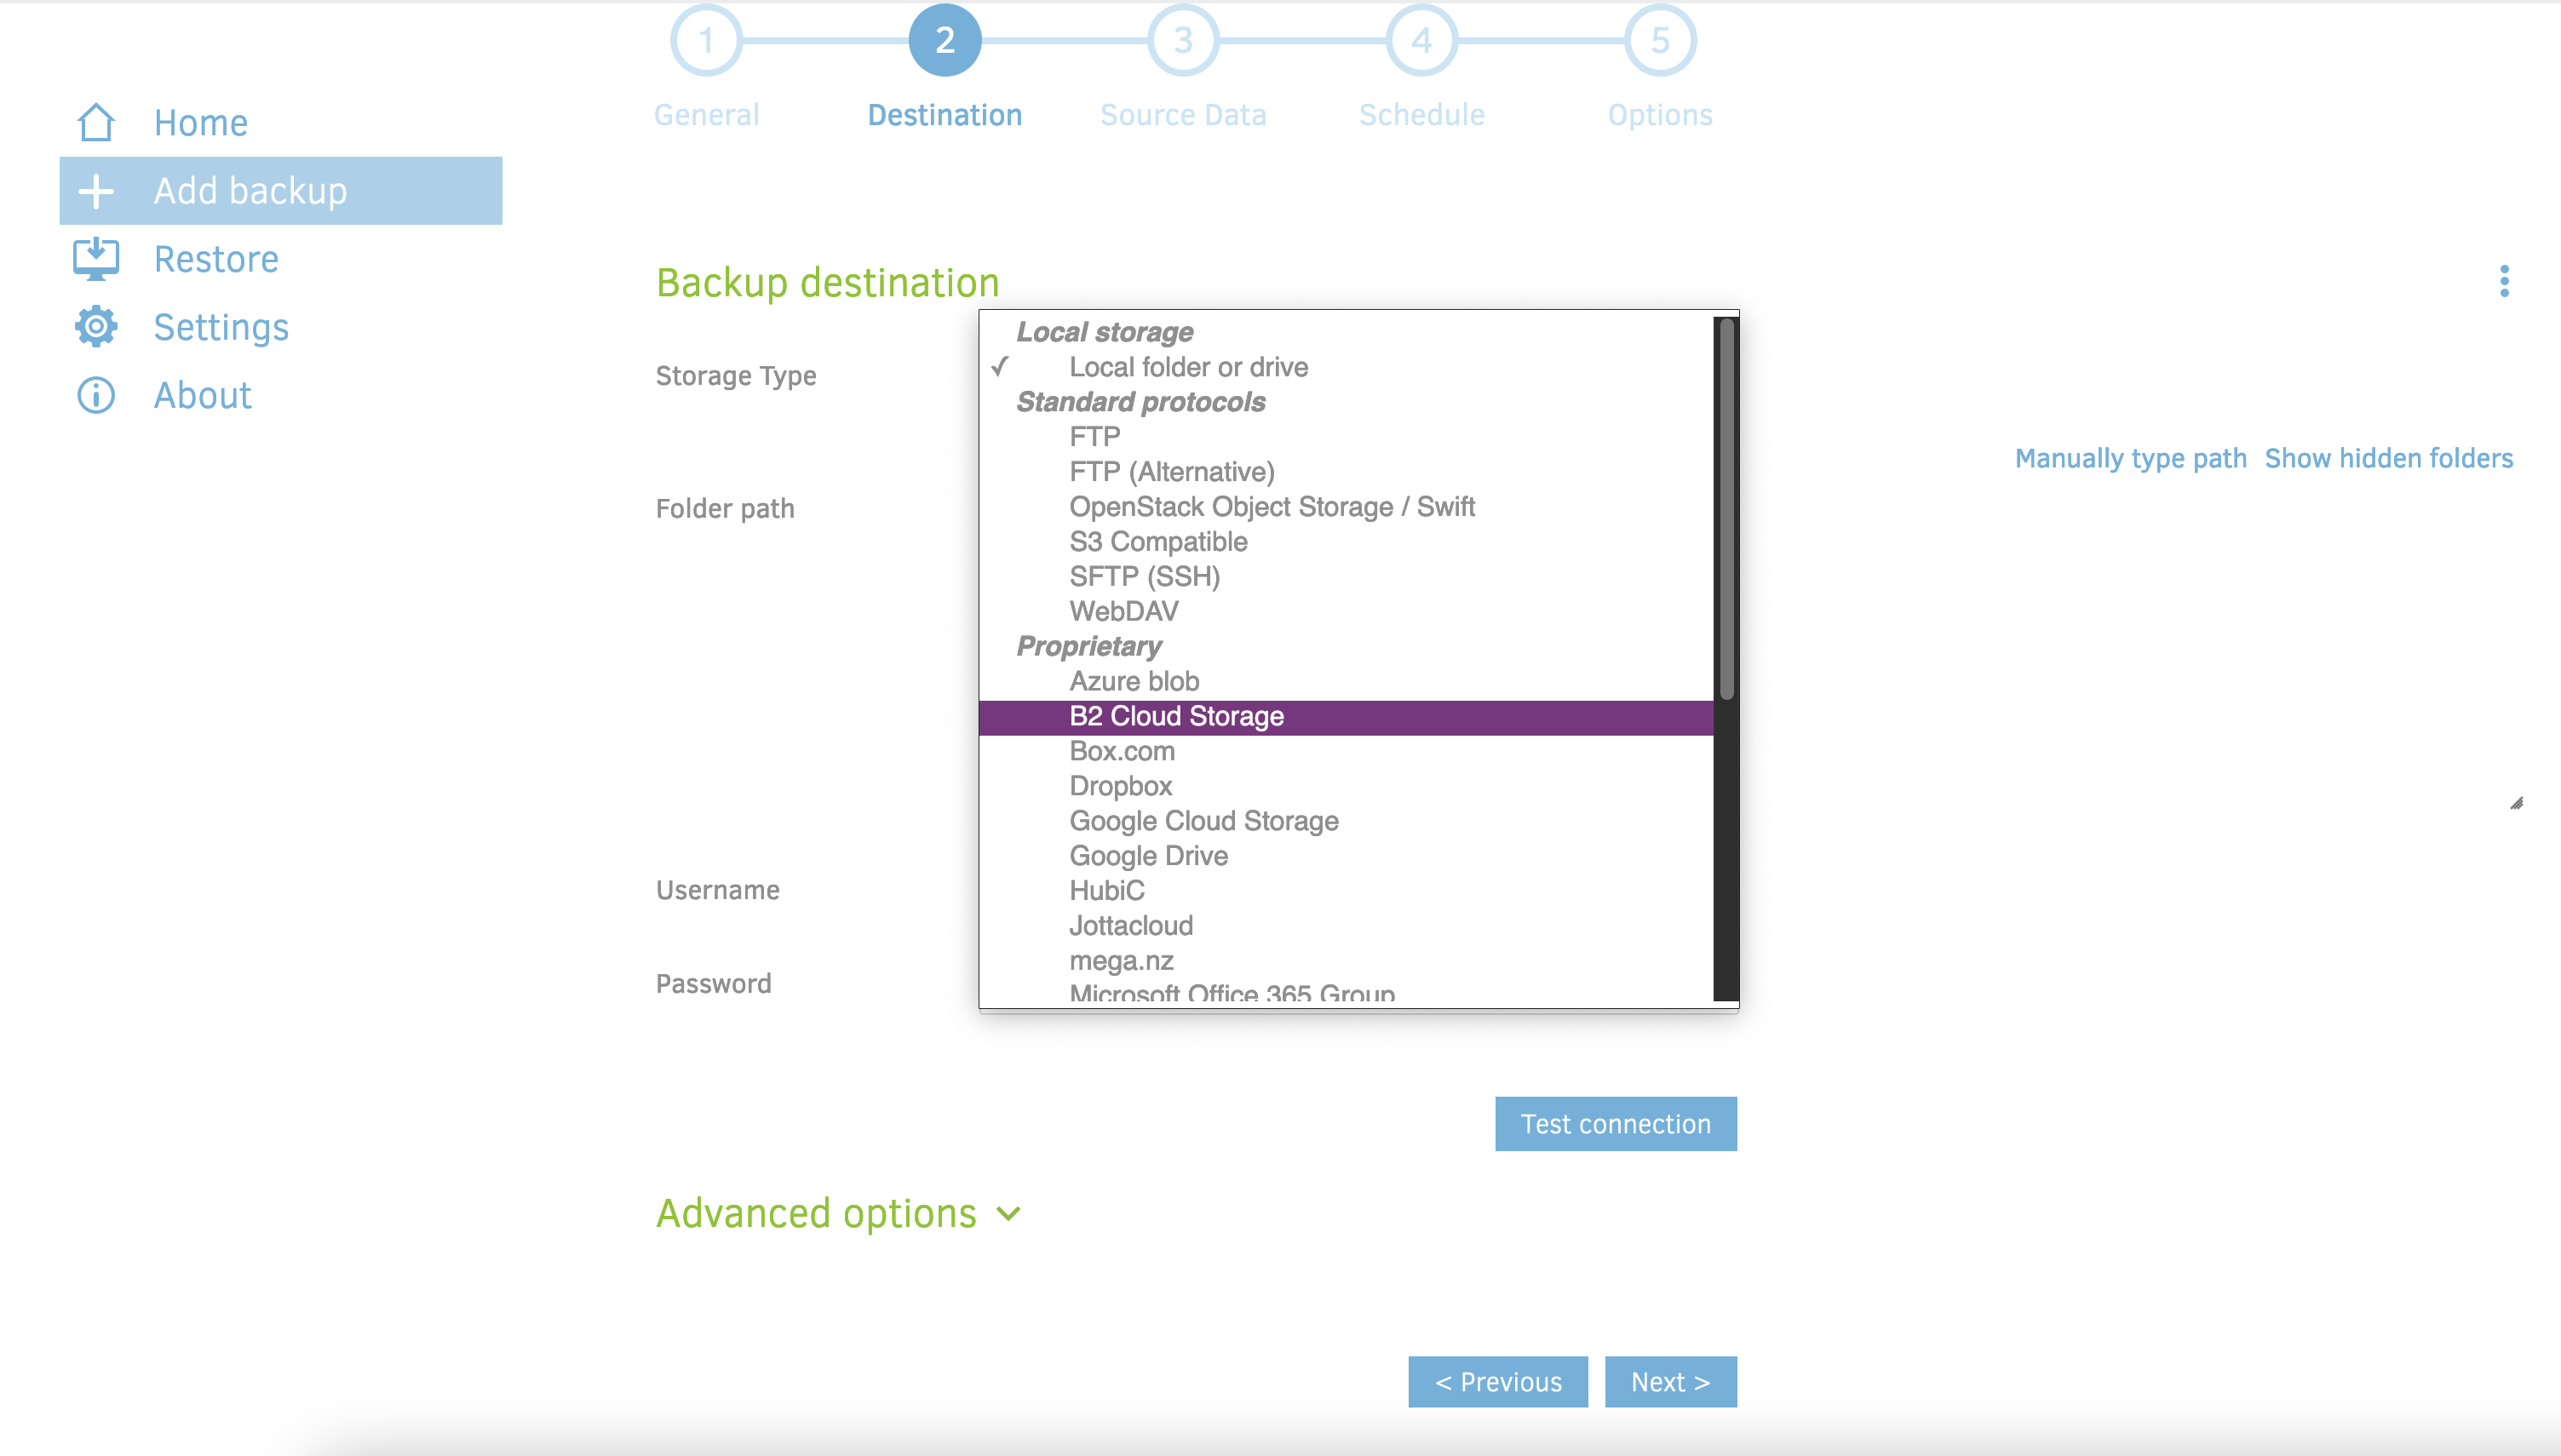
Now you need to enter the bucket name, applicationID, and applicationKey you set up in the “Setting up Backblaze” section.
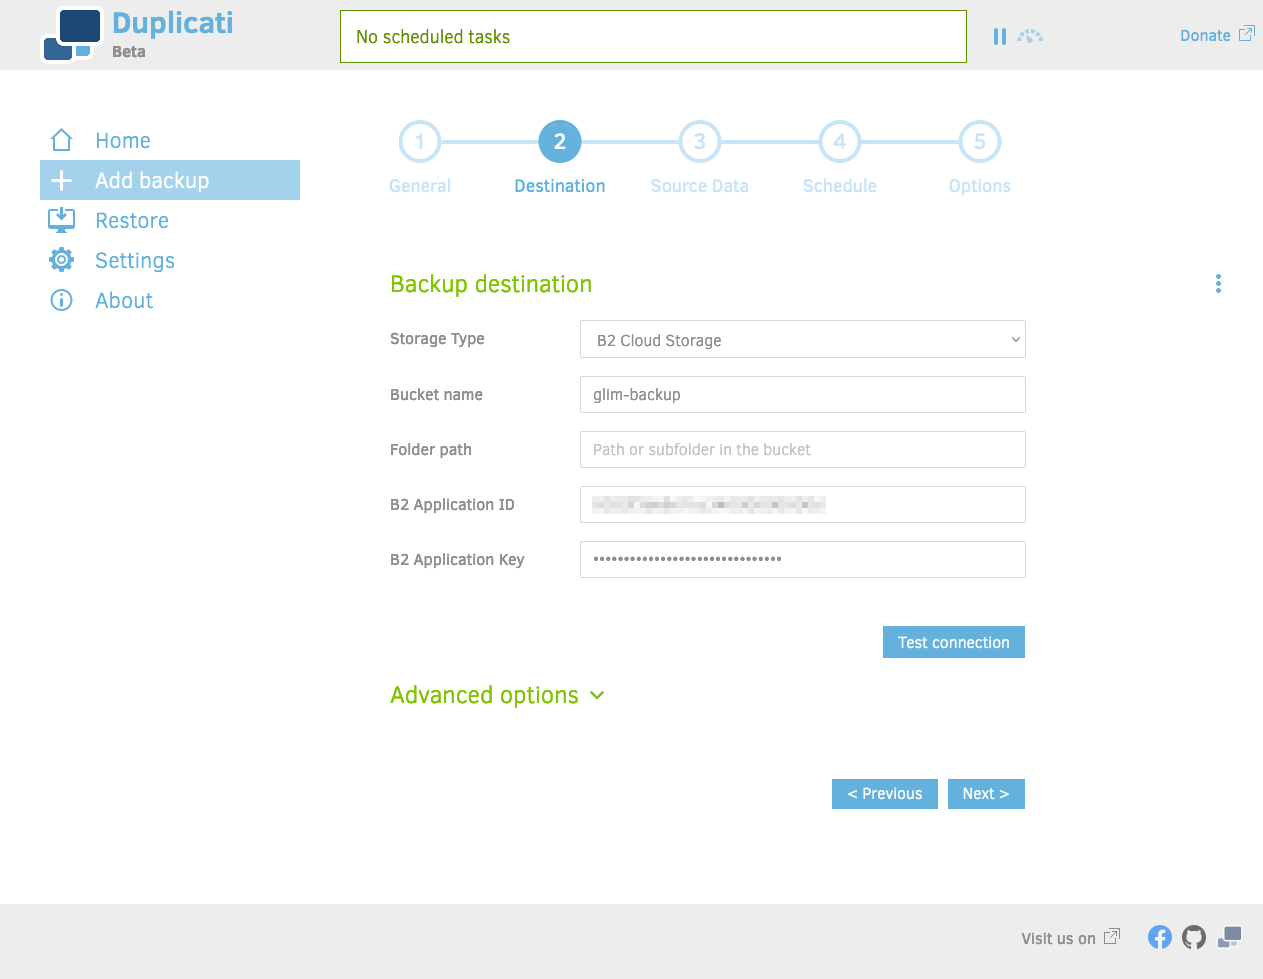
Click the “Test connection” button. After a few seconds, it should say “Connection worked”; if not, go back and check the bucket name, applicationID, and applicationKey. If necessary you can go back to Backblaze and make new ones.
Once you’ve verified that the connection works, click Next.
Step 3: Source Data
This is where you decide which files you want to back up. Typically there’s no point in backing up programs or your operating system; if something goes wrong it will be easier to reinstall those from discs or the internet. Mainly you want to back up everything you’ve created: photos, documents, spreadsheets, and so forth, plus things like Music that would be hard to replace. On my Macbook, I’m just backing up my whole user folder, excluding Applications, Library, and Downloads.
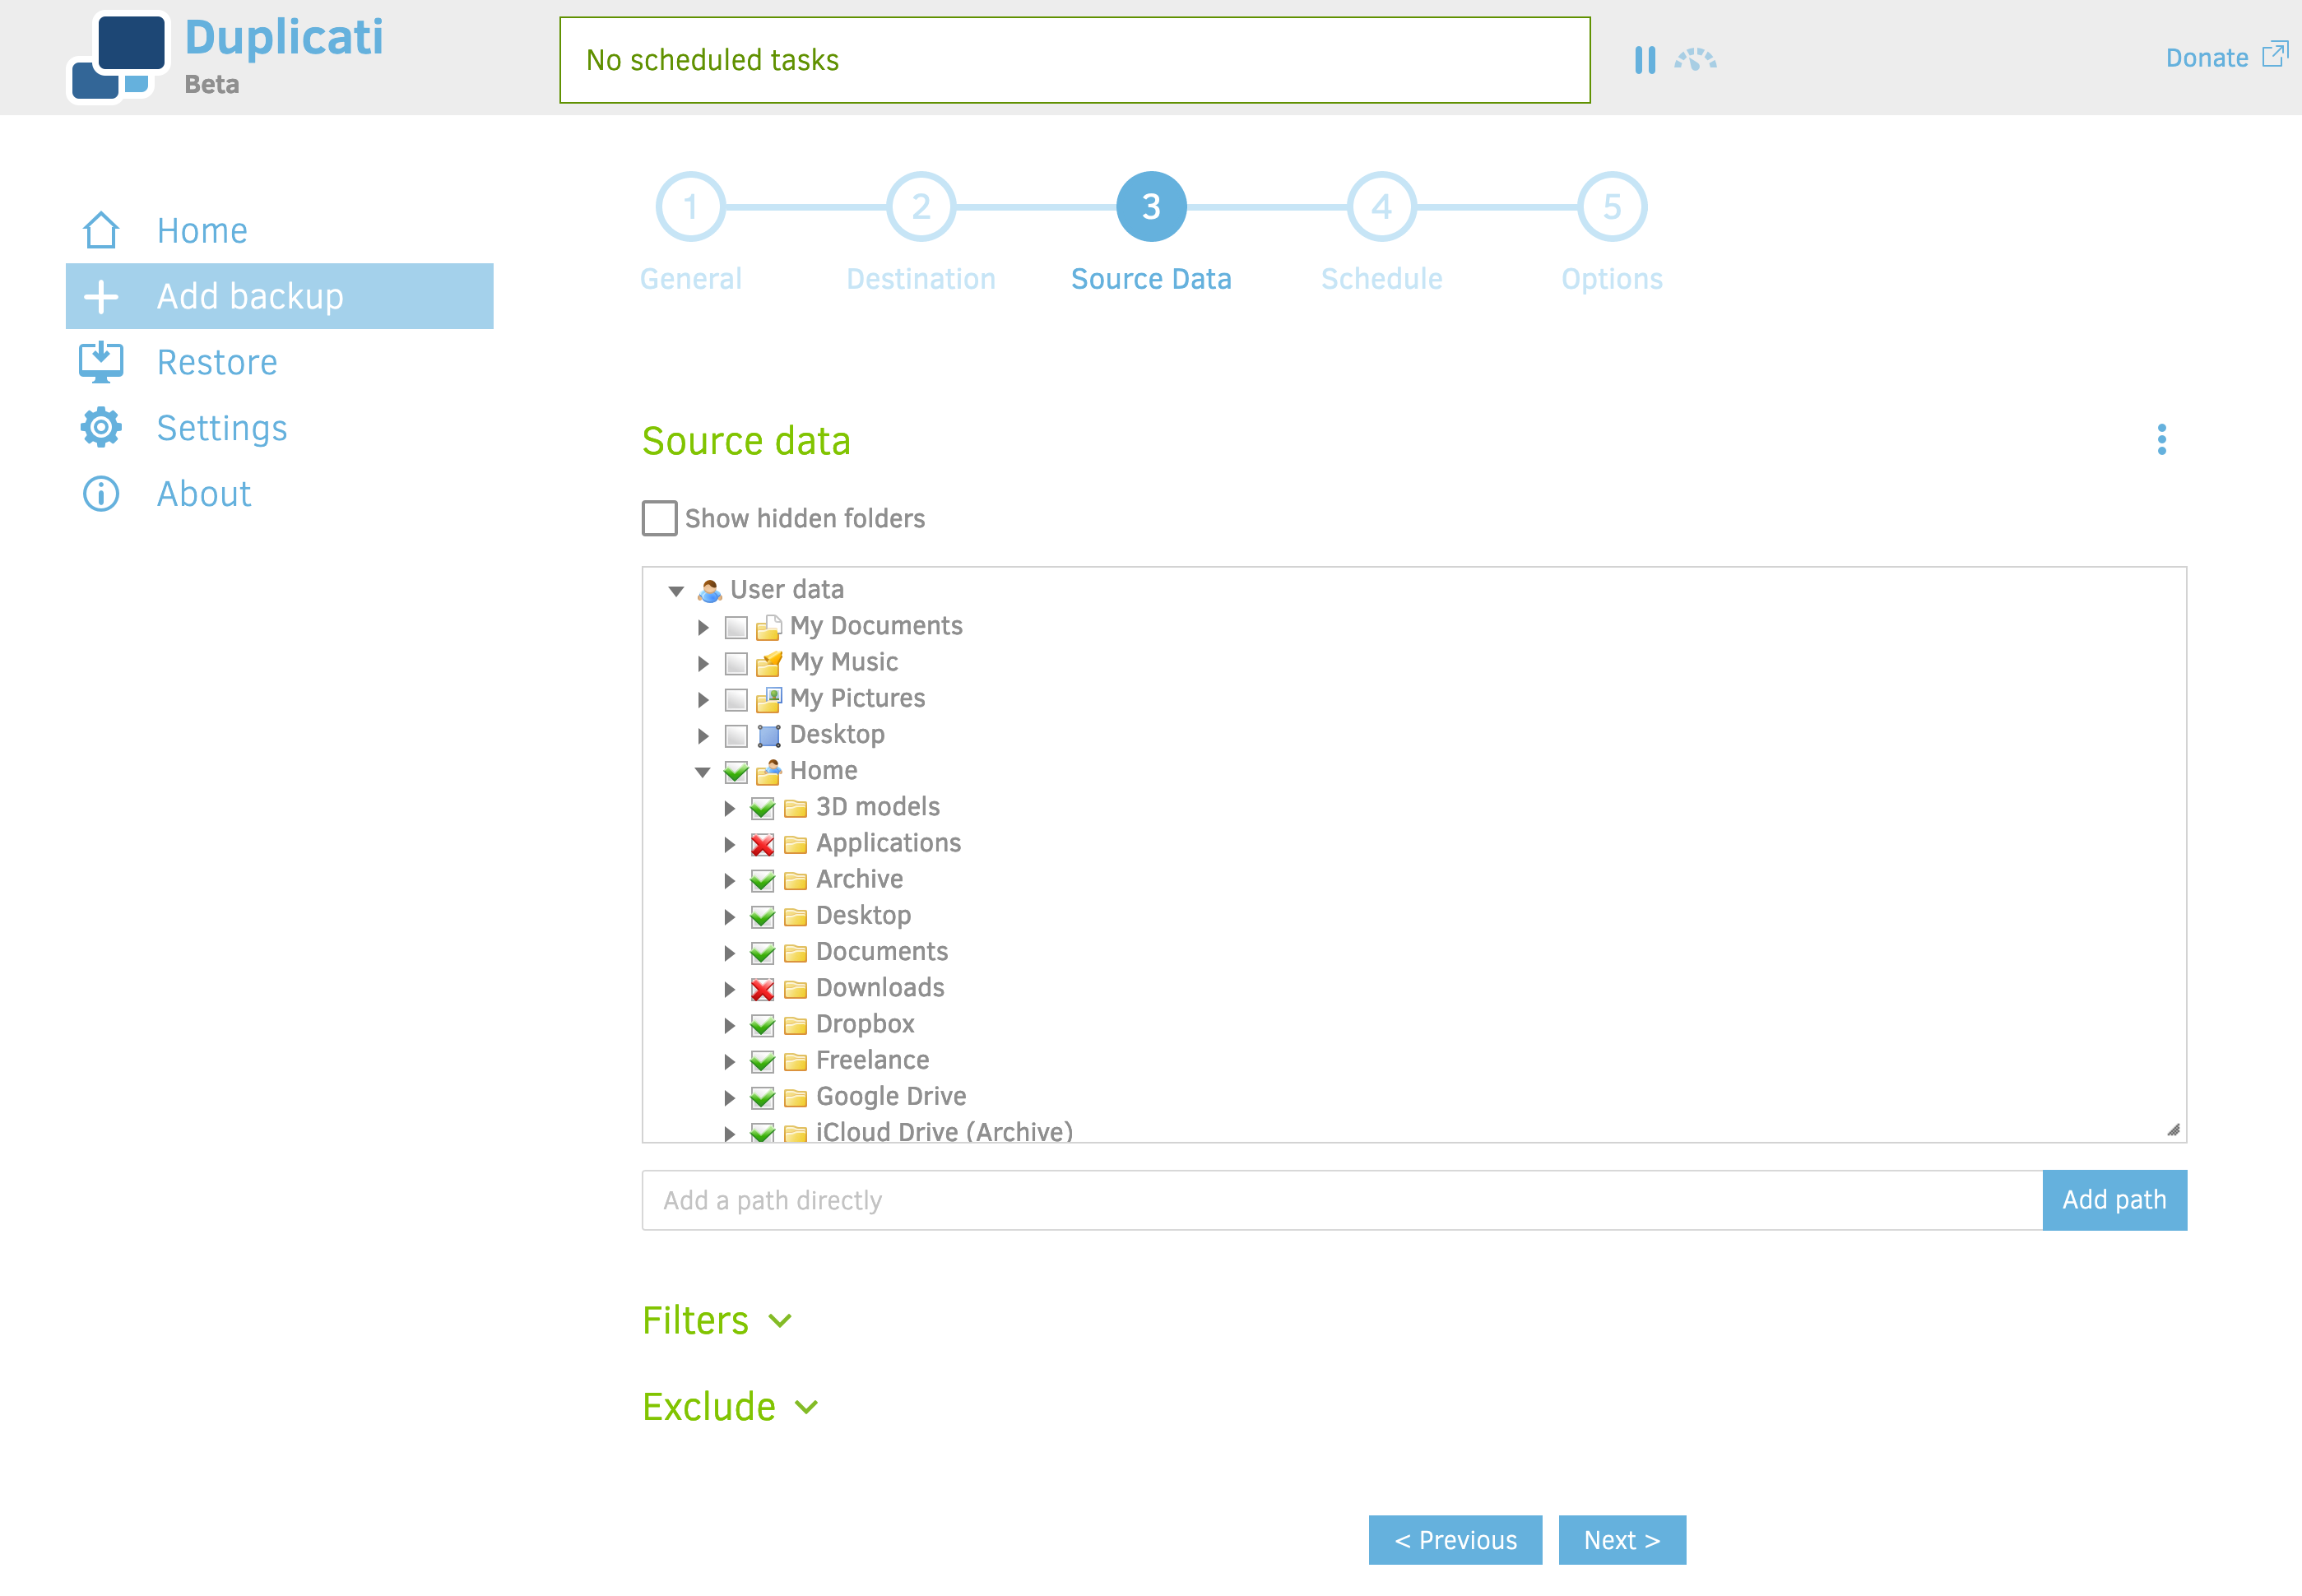
Hint: Look at the lower-right corner of the box where you select folders to back up, right above the “Add path” button. There’s a small drag handle there; dragging it will let you make the box bigger. When you’re done, click Next.
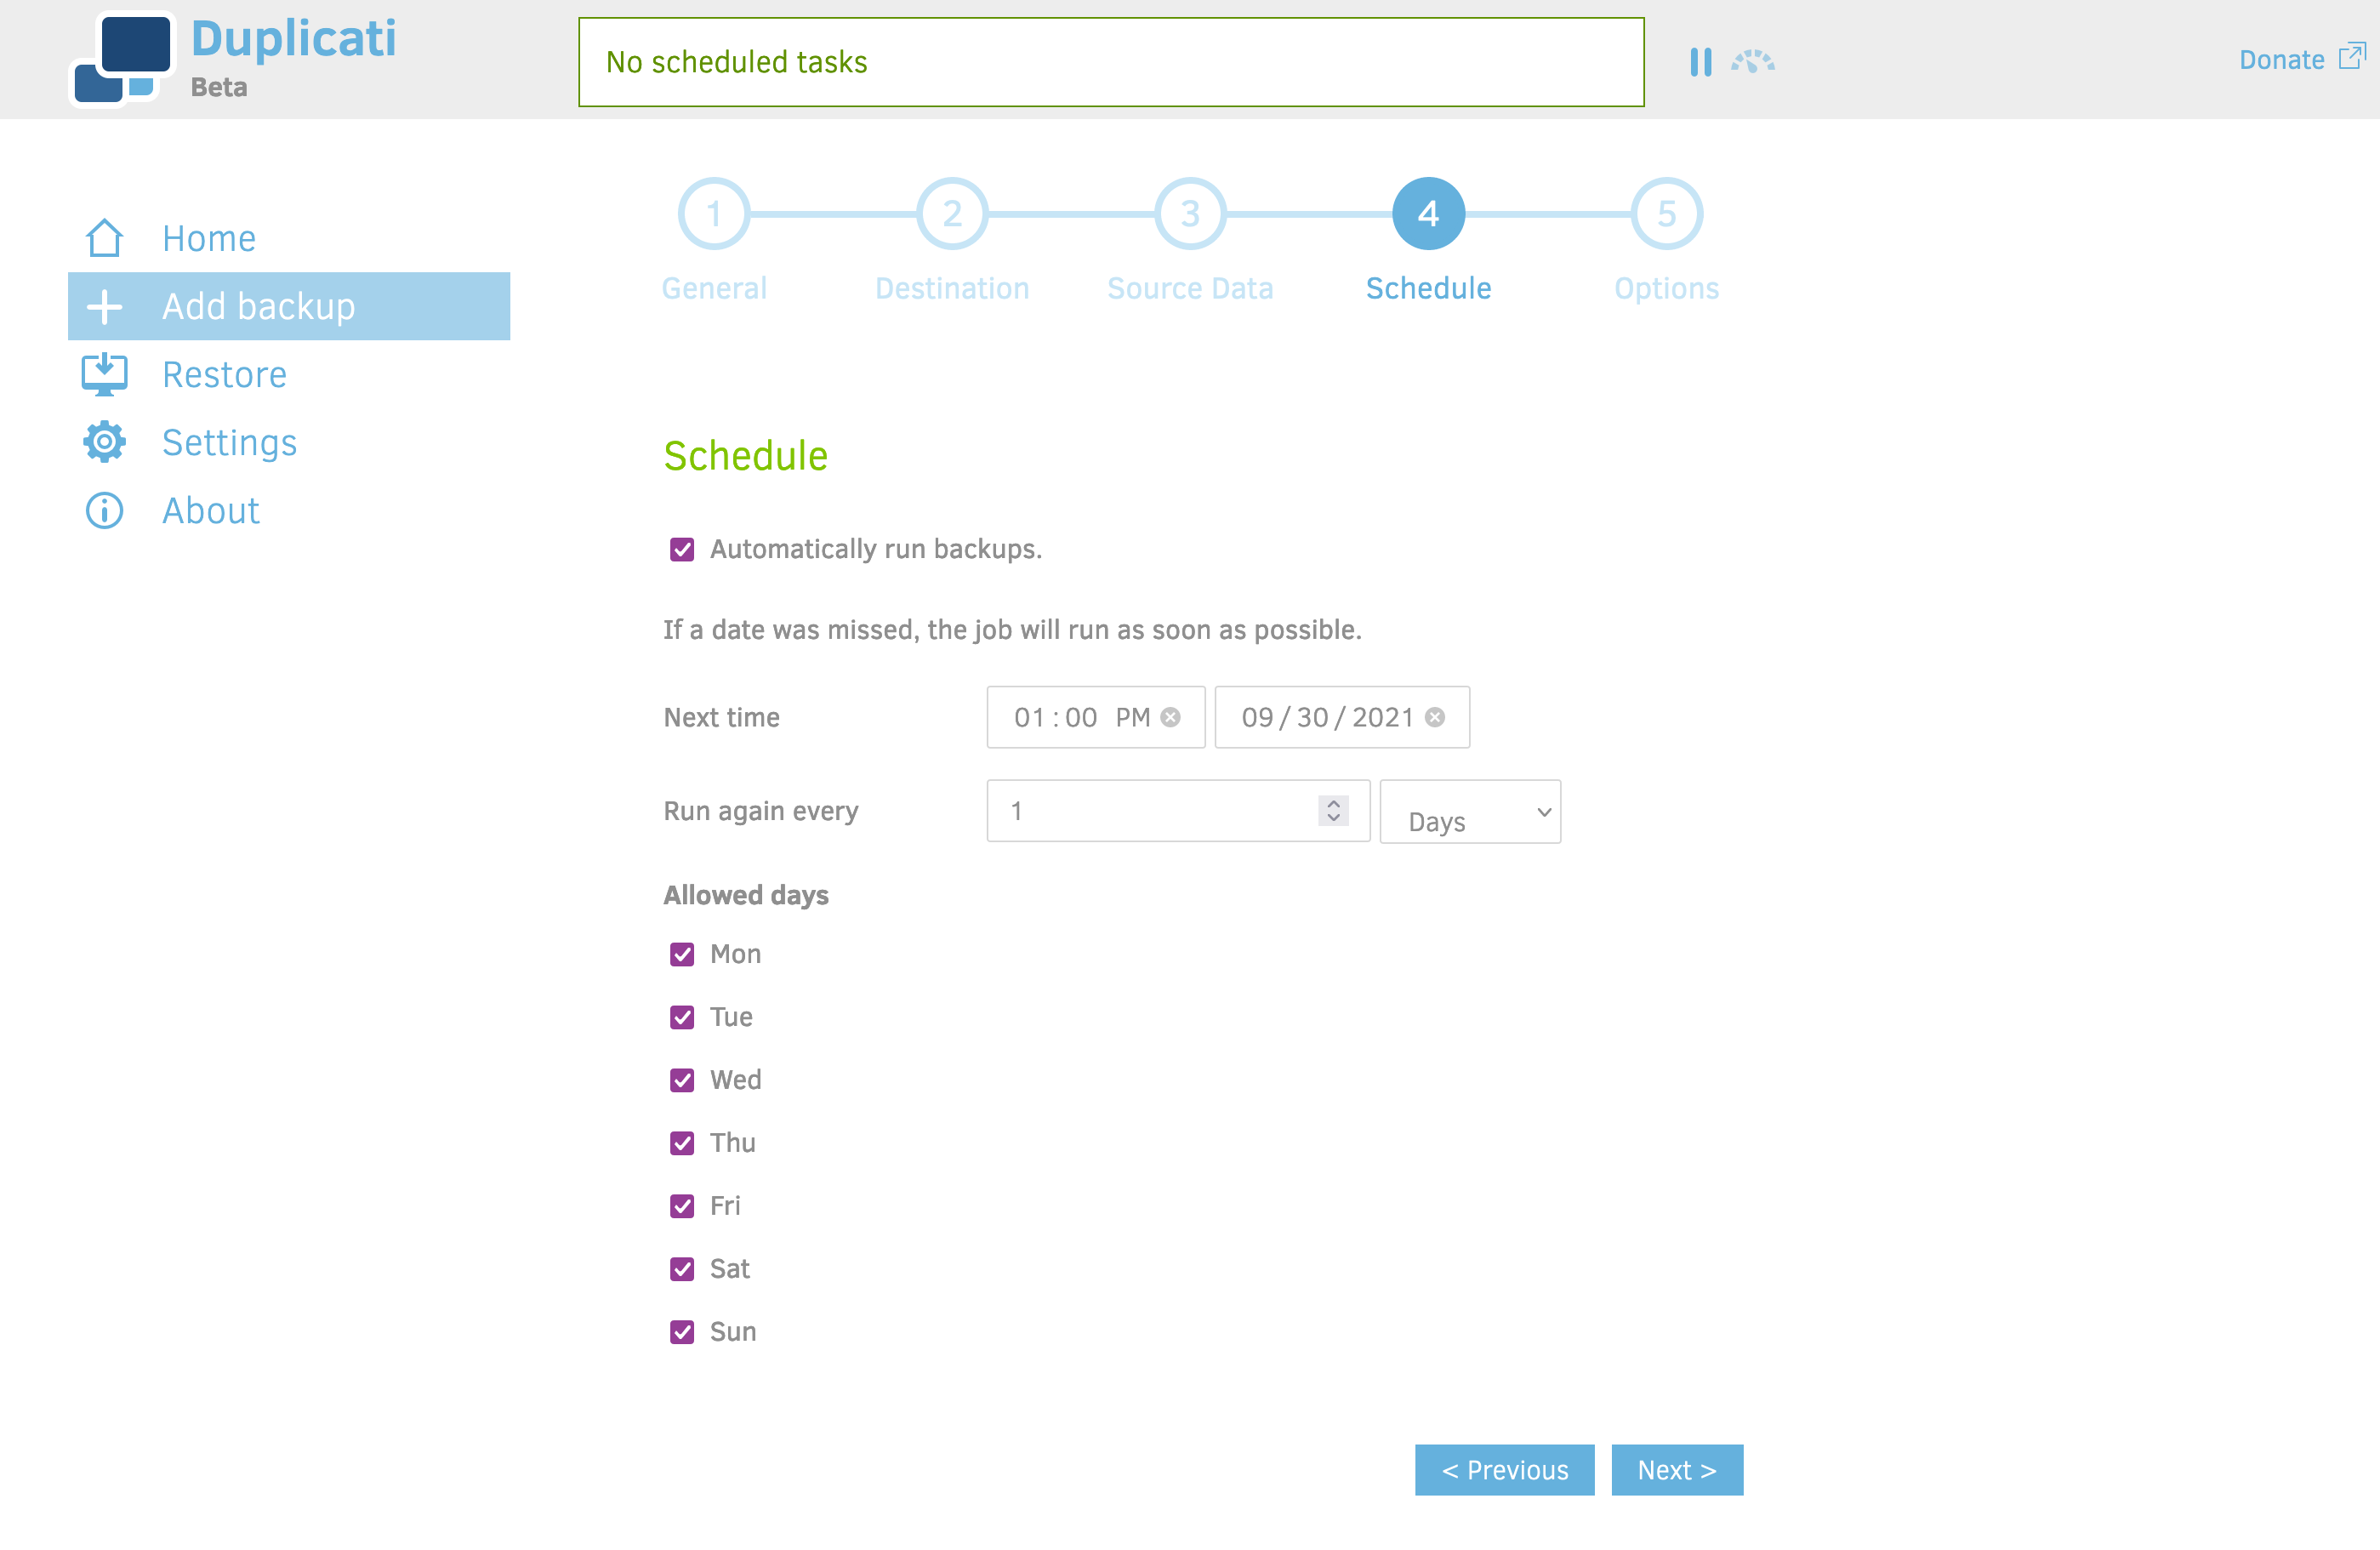
Step 4: Schedule
This is where you can change how often backups happen. The defaults are probably fine. Click Next.
Step 5: Options
In the introduction I talked about versioned backups and how they protect against ransomware. By default, Duplicati keeps every version of every backup it makes. That’s going to consume a lot of storage space and hence a lot of money. I recommend changing “Backup retention” to “Smart”; that’s a good compromise that will offer excellent protection without costing too much.
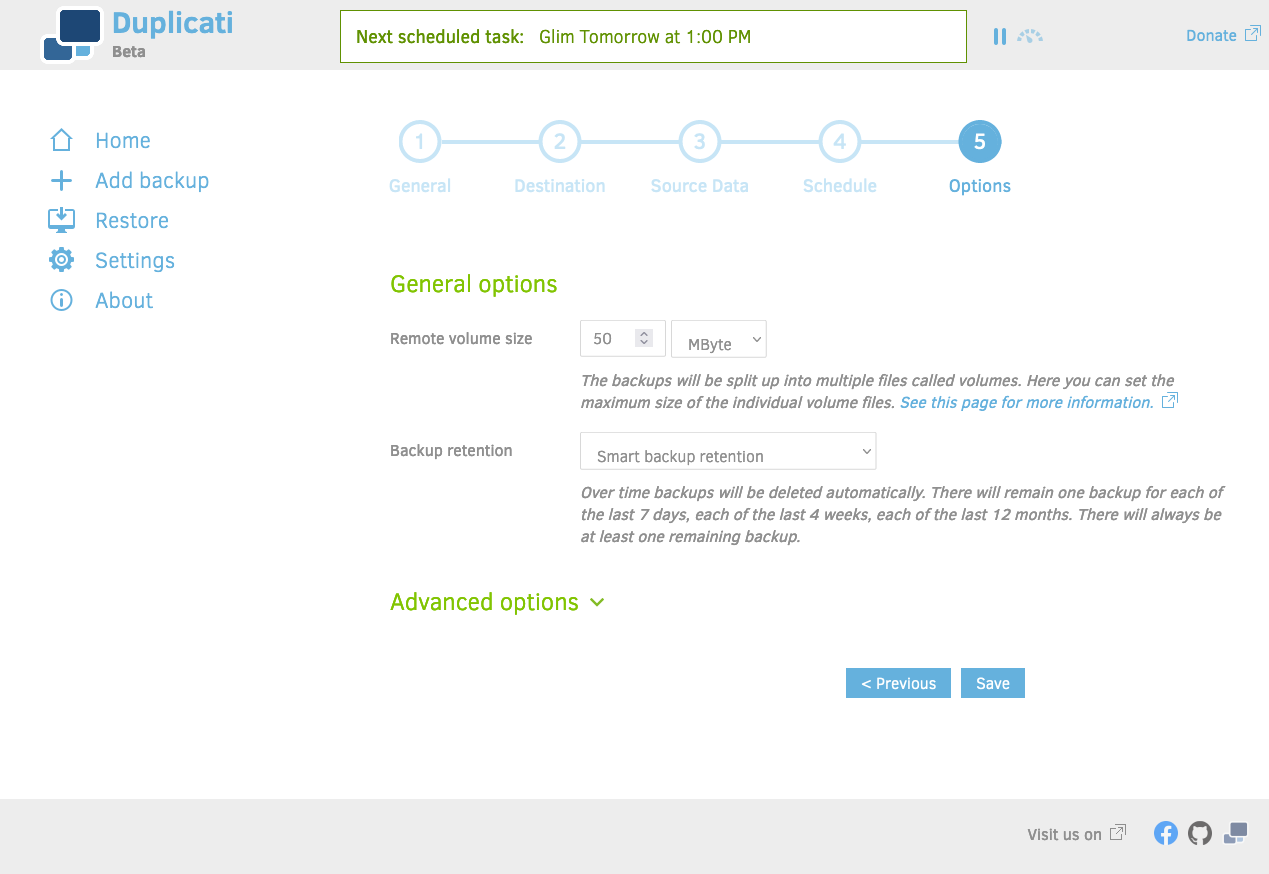
When you’re done, click Save. Your backup job is ready to run!

Click “Run now”. This will probably take a few hours.
Filtering out unneeded files
When I came back and looked at my backup job, it had a yellow box that said “Encountered 8 warnings.”
It’s pretty common that there will be system files that backup programs won’t be able to access. This is fine. We should tell Duplicati not to bother backing these up; that will get rid of the warnings.
First, make a note of which files need to be excluded from your backup job. In my case I have a “.Trash” folder and a “Photos Library.photoslibrary” folder. (You can tell these are folders instead of files because each has a / at the end of its name.)
Click Home, then click on your backup job. Under “Configuration”, click “Edit…” Then click “3. Source Data”. Click “Exclude” and “Filters” to expand those sections.
First let’s look at the “Exclude” section. Duplicati has some built-in filters here for us; details are available in the documentation. You should probably turn on the “Hidden files”, “System files”, and “Temporary files” filters unless you have a reason to want them off. (I use hidden files in my programming work, so I’m going to leave that filter off.)
Okay, let’s go back up to the Filters section. I want to exclude my “.Trash” folder, so I’m going to click “Add filter”. An empty filter appears; I set the dropdown to “Exclude directories whose names contain”. In the box next to it, I type “.Trash”.
Now I have a filter that excludes “.Trash” folders. I’ll do the same thing again to exclude “.photoslibrary” folders.
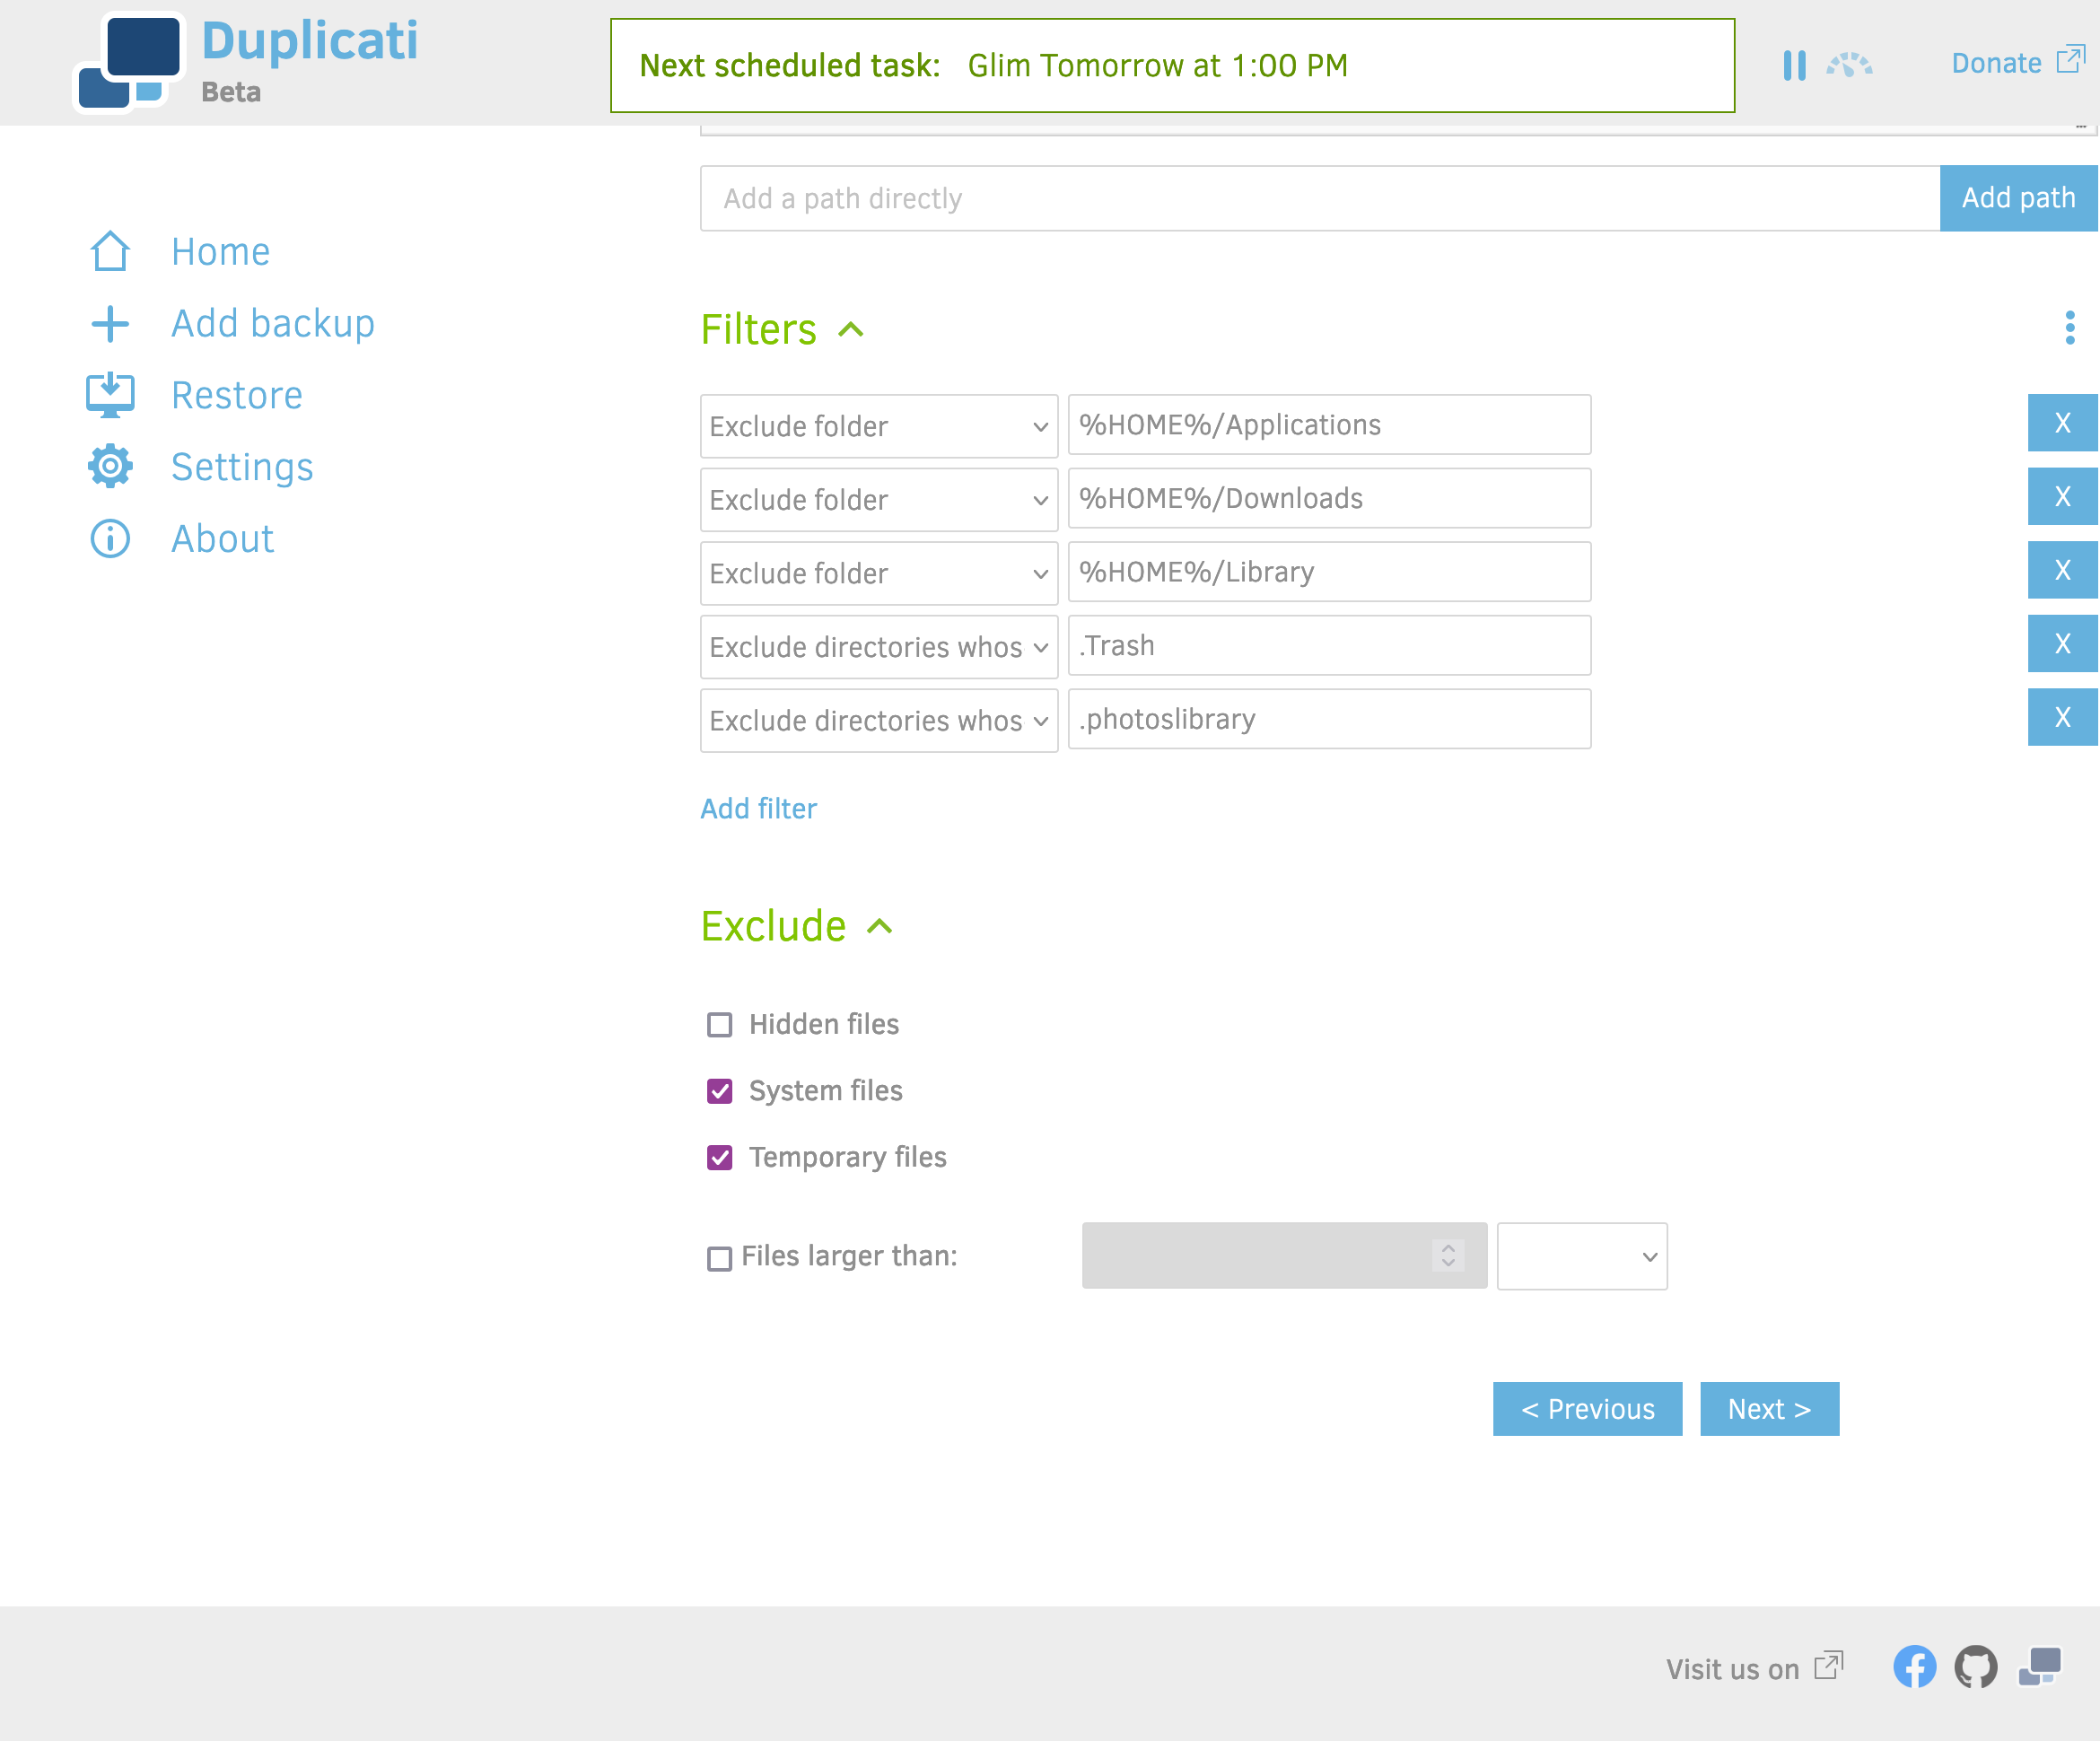
Our filters are all set up. (The other three “Exclude folder” filters were created automatically when I deselected certain subfolders when I was setting this job up.) To save your filters, click Next, Next, and then Save. Then click Run Now. This won’t take nearly as long as last time; Duplicati will just look for files that have changed, which probably isn’t many.
Wait for your backup to finish. If it reports errors again, go back and edit your filters. You don’t want to routinely see errors as part of your backups – if you do, you’ll learn to ignore them, and then someday when you get a real error and your backups stop working you won’t know about it. Consult the documentation if you get stuck.
Testing your backups
You know what the worst feeling in the world is? Going into your backup system to restore a bunch of lost files and realizing your backup system was set up wrong and you don’t actually have usable backups.
So this last step is an important one. We’re going to verify that our backups work.
Click Restore, then the name of your computer. Click Next. Duplicati will take a moment to go into your backups and retrieve a hierarchy of your files. Navigate through the folder structure and pick a file to restore, then click Continue.
Now you’re on the “Restore options” screen. Select “Pick location”, then click “Browse”. Click Desktop, then scroll down and click the Restore button.
The screen will change to a progress bar; when it’s done, you’ll see the message “Your files and folders have been restored successfully.” Check your desktop. Is the file in place?
If it is, breathe a sigh of relief. All of your files are safe. You did it!