
Infrastructure hardening: Password vault
Part of my series on hardening your personal infrastructure. A guide for Windows, MacOS, and Android.
Introduction
Now that you can securely synchronize information between your computers, let’s build something on top of that!
Someday we will ascend beyond the need for passwords. Until that glorious day, the single best thing you can do to keep yourself safe online is to use different, random passwords for every website and keep them in a password vault. This is because in hacker land, guessing people’s passwords is no longer the new hotness – it’s expensive and it doesn’t scale. These days the cool hackers will just break into a site and steal their password database.
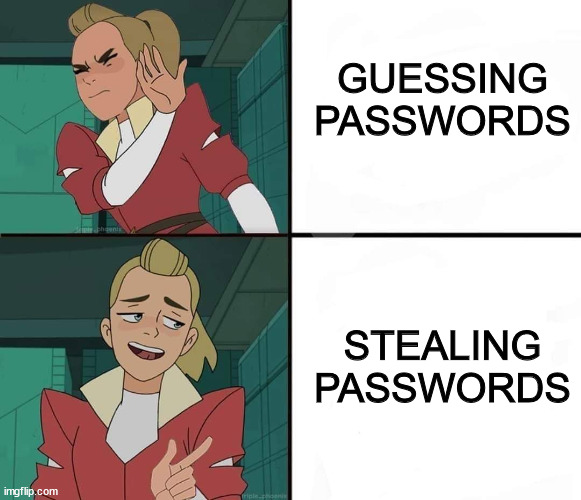
Most people have a small number of passwords that they reuse across a bunch of websites. So now that the hacker has your username and password for one site, they’ll try that combination on a bunch of other sites to see what they can get into. Sometimes people will add small variations to the password, like adding “boa” to their Bank of America password; those usually aren’t too hard to guess, because if they were, they’d be hard to remember. Exploiting password reuse in this way is called “credential stuffing”, and it’s now the dominant paradigm for breaking into people’s accounts.
The consensus among security researchers is that the best way for the average joe to protect against this is to use a password vault. A password vault will auto-generate a strong, unique password for each website and then remember them for you. All of your site-specific passwords get secured behind a single master password which you use to access the vault. Not only is this more secure, it’s more convenient, because you don’t have to remember all those passwords any more.
“But wait!” I hear you cry. “‘Tis a scam! How do I know the password vault company won’t get hacked?” And you know what, fair point. Vendors like LastPass and DashLane keep your password vault in the cloud, where you (or someone claiming to be you) can access it from anywhere. They take security seriously, and have various measures in place to rebuff attackers, but storing all the passwords for thousands of customers is certainly painting a big target on yourself. So let’s set up a password vault that won’t have that problem.
I looked at a lot of different password vaults as part of writing this. Obviously security is important for something like this, but so is ease-of-use, and I feel like not all developers get that. If using software the right way is hard, people will find a way that’s easy, and it probably won’t be secure; that’s why people write passwords on sticky notes and reuse passwords across websites. So in writing this guide I’m trying to make everything as straightforward as I possibly can; if you get stuck, let me know in the comments and I’ll see what I can do.
I’m recommending KeePassXC for its ease-of-use, browser integration, and cross-platform compatibility. This is an open-source password vault recommended by the Electronic Freedom Foundation that’s actively maintained by volunteers who check each other’s work. Importantly for our purposes, it doesn’t use the cloud at all – the password vault is saved to a file on your hard drive, which we’ll sync between our computers using Syncthing.
The best thing about this is that it’s yours forever. No company going out of business can take away your password vault. KeePassXC is one of many “forks” (versions) of KeePass; they’re maintained by different people and they all use the same file format. If you decide you don’t like KeePassXC you can switch to a different fork of KeePass and your database will still work.
Of course, the fact that this is yours means it will be a little more work than something that someone else manages for you, but not a lot more; we’re going to keep it as simple as we can. If you see an error message, google for “keepass” and whatever the error says; KeePass is popular enough that you can probably find someone who’s had the same problem. Refer to this cheat sheet if you get stuck.
You can do this, dear reader. I believe in you.
Setup
Download KeePassXC from the download page. If you’re on Windows, click “MSI Installer”. Run the setup program that gets downloaded, making sure “start on login” is checked; when it’s done, open the program. Now we need to create our password vault.
Importing passwords from another program
Before we proceed, if you already have passwords stored somewhere, whether it’s in another password manager or your browser, you’ll need to export those so we can load them into KeePass. (If you don’t have your passwords stored somewhere, skip to the next section.)
The format you’ll want to export your passwords in is called CSV (short for “comma-separated value”); it’s a universal interchange format supported by pretty much everything. Go wherever your passwords are stored and export them as a CSV file. Here’s how to do that in Google Chrome; you can find tutorials for other programs by googling the name of the program and “export passwords to csv”.
Got your CSV file? Good. In KeePassXC, click “Import from CSV” and open your CSV file. Give your database a name (“Passwords” is fine) and click “Continue” twice.
Now it’s time to choose a master password for your vault. I recommend picking a favorite song lyric. You don’t need letters and numbers or any of that, just four to five words. (“Passphrase” is perhaps a better term than “password”, but old habits die hard.) Make sure it’s something you’ll remember; this password is the only way into your password vault – there is no backdoor and no recovery process. You’ll need to type this password to unlock your password vault each time you turn on your computer, so don’t make it so long that it’s annoying to type in. I recommend that you write it down and keep it somewhere safe – a place where someone wouldn’t get the password if they physically stole your computer. Then click Done.
Next KeePass will ask where to store your password database. This is up to you; I’m going to create a new folder called Sync to hold files I want to sync between computers. I’m naming my vault “Passwords.kdbx”.
Now we need to help KeePass figure out how to interpret the CSV file. A CSV file is basically a bunch of rows and columns, like a spreadsheet. KeePass needs to know which column has the usernames in it, which one has the passwords, and so forth.

The first thing to check is whether your CSV file puts field names in the first row. Cast your eye upon the “Preview” section in the bottom half of the screen. Does row 1 have things like “TITLE”, “USERNAME”, “PASSWORD” in it? If so, you need to check the box that says “First line has field names”. (If your CSV file is large, it may take a few seconds for KeePass to reprocess it.)
Now look at the “Column Association” area. Click the dropdown next to “Username” and it will give you a list of the columns in the CSV; pick the one that either says “USERNAME” or looks like it has a username in it. Next, click the Password dropdown, looking for either “PASSWORD” or something that looks like a password. Do the same for each other field; if you don’t see a good fit, click “Not Present” at the top of the dropdown. As you go, keep an eye on the Preview area; you want the “Username” column to have usernames in it, the “Passwords” column to have passwords, and so forth.
When you’re done, click OK. If you did it right, you’ll be looking at a password database with all your stuff in it! Spot-check a few items to make sure they’ve imported correctly, then delete the CSV file. That file has all of your passwords in it unencrypted – you don’t want to leave it lying around.
Starting from scratch
If you don’t have all your passwords saved anywhere, you just have to create an empty database. Click “Create new database” and click Continue twice.
Your vault needs a master password; if there’s a song lyric that often gets stuck in your head, that would be a good choice. I don’t recommend putting letters and numbers in it; they make it harder to remember and harder to type, and if the password is at least four words long, you don’t need the extra security. The main thing is that you must be able to remember it – if you forget this password, there is no password reset, so your password vault is lost. You will need to type in this password to unlock your password vault whenever you restart your computer, so don’t make it excessively long. You should write this password down and keep it somewhere separate from your computer so a computer thief isn’t likely to get it.
Next KeePass will ask where to store your password database. This is up to you; I’m going to create a new folder called Sync to hold files I want to sync between computers. I’m naming my vault “Passwords.kdbx”.
Once you’ve saved your database, you should be seeing a folder named “Root” on the left and an empty listing on the right. Congratulations – you have a password database!
Setting up minimize to tray
If you’re like me, you don’t like having extra windows open all the time. We need to have KeePassXC open to use our password vault, but we want it out of the way, so let’s have it turn into an icon in our tray when we’re not using it. (On Windows, the tray is the collection of icons by your system clock in the lower-right corner of your screen. You probably have just a few icons visible most of the time; click the little arrow to see the rest of them. On Mac, the icon will go in your menu bar.)
In KeePassXC, click the gear icon to open Settings. On the left, “General” should be selected. Go through and check these boxes:
- Automatically launch KeePassXC at system startup
- Minimize window after unlocking database
Now scroll down to “User Interface” and check these boxes:
- Minimize instead of app exit
- Show a system tray icon
- Hide window to system tray when minimized
Much better. Now let’s set up your various devices so they can use your password vault.
Setting up the browser extension
KeePassXC offers a browser extension that will autofill passwords on websites for you. This will make our day-to-day lives a lot easier.
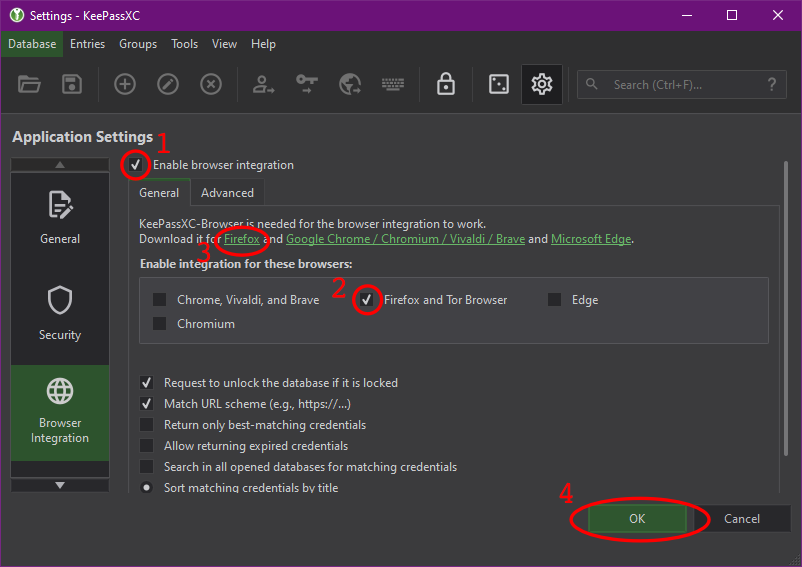
- Open KeePassXC’s Settings window by clicking the gear icon on the menu bar.
- Click “Browser Integration” on the left.
- Check the box that says “Enable browser integration”.
- Check the box(es) for the browser(s) you use. Then click the link(s) corresponding to the browser(s) you use; this will take you to a page where you can install each browser extension. Click OK.
- Once you’ve clicked OK in KeePass and installed the browser extension, click its toolbar button to open it, then click “Connect”. (If this doesn’t work, try restarting your browser.)
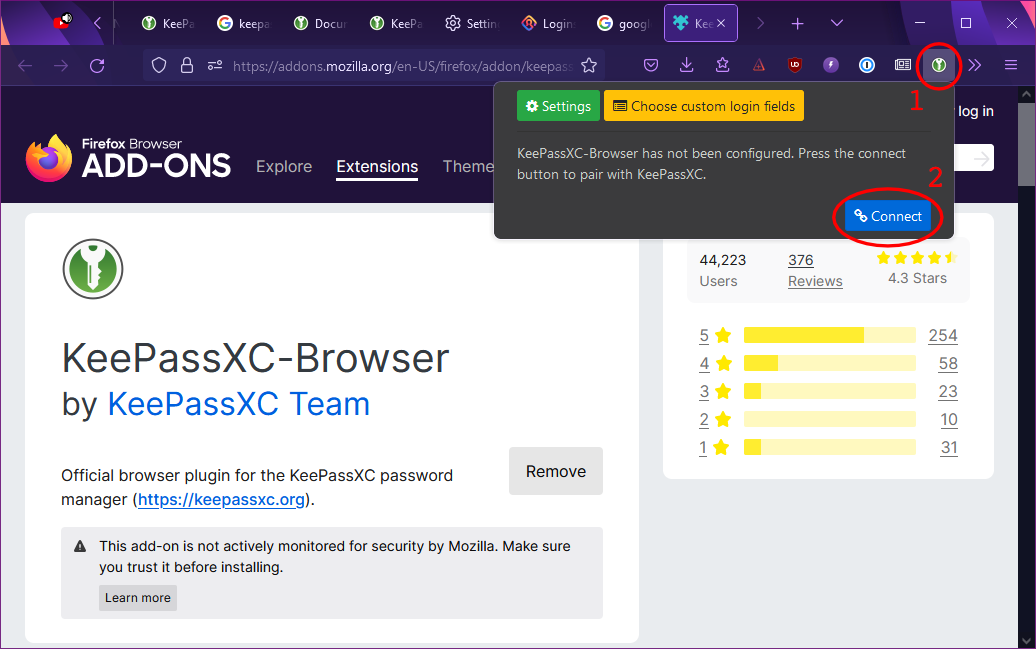
- KeePass will ask you to name the connection. Type in the name of your browser.
Let’s change some settings that will make things easier for us later. First, open the KeePass Browser Integration Settings window again, as you did in steps 1 and 2 above. Click the “Advanced” tab. Check the box that says “Never ask before accessing credentials”. If you don’t do this, KeePass will pop up a “Browser Access Request” window every time it has a password to offer you, which is annoying.
Now let’s go look at the settings for the browser extension.
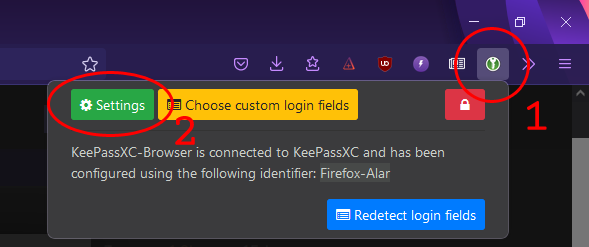
Click the extension in your browser toolbar, then click “Settings”. On the Settings screen, check the “Activate password generator icons” box. This will make it easier for us to generate passwords later.
Setting up the phone app
Now we’re going to set up your password vault on your phone.
First, make sure your database is in a folder that’s being synced to your phone with Syncthing as discussed in my last post.
Next, if you have an Android phone, click this link to install KeePassDX, another fork of KeePass. I don’t have an iPhone, but there are a number of iPhone apps available from KeePass’ website; pick one that looks good to you. (If you find one you like, please comment and I’ll add it to this guide.)
Open the app and click “Open Existing Database”. Browse to the location of the synced folder and tap on your password database.
KeePassDX will make you tap through several pop-ups that chirpily explain its various controls and features. Remain calm and tap where it tells you to tap. Type in your vault’s password, then tap the fingerprint icon near the top of the screen. Now put your finger on your phone’s fingerprint scanner. Your vault will open, and KeePassDX will ask for a quick fingerprint swipe in the future rather than making you retype your password when you want to use your password vault. (Your fingerprint is saved only on your phone and isn’t uploaded anywhere.)
Now that your password vault is open, we’re going to set up your phone so that KeePassDX can auto-fill passwords in your browser.
- Tap the three-dot menu button in the top-right corner.
- Tap Settings.
- Tap Form Filling.
- Tap Set default autofill service.
- Tap KeePassDX form autofilling.
- Your phone will warn you about data privacy. Click OK.
We’re all set. You may notice a “Database opened” entry in your phone’s notification pane; Android requires apps that want to run in the background (like KeePassDX) to display a notification. I like to keep my notifications tidy, so I’m going to swipe right on the notification, tap the gear icon, tap “Turn off notifications”, tap the switch next to “Database”, and tap “Apply”. No more persistent notification.
Using the browser extension
You finished setup! Good for you. Now let’s do a quick walkthrough of how to use your password vault day-to-day.
You can manage your passwords either through the browser extension or directly in the app. I like the browser extension since it doesn’t pull me out of my workflow.
If the browser extension isn’t working, make sure that KeePassXC is open and your vault is unlocked.
Creating a new password
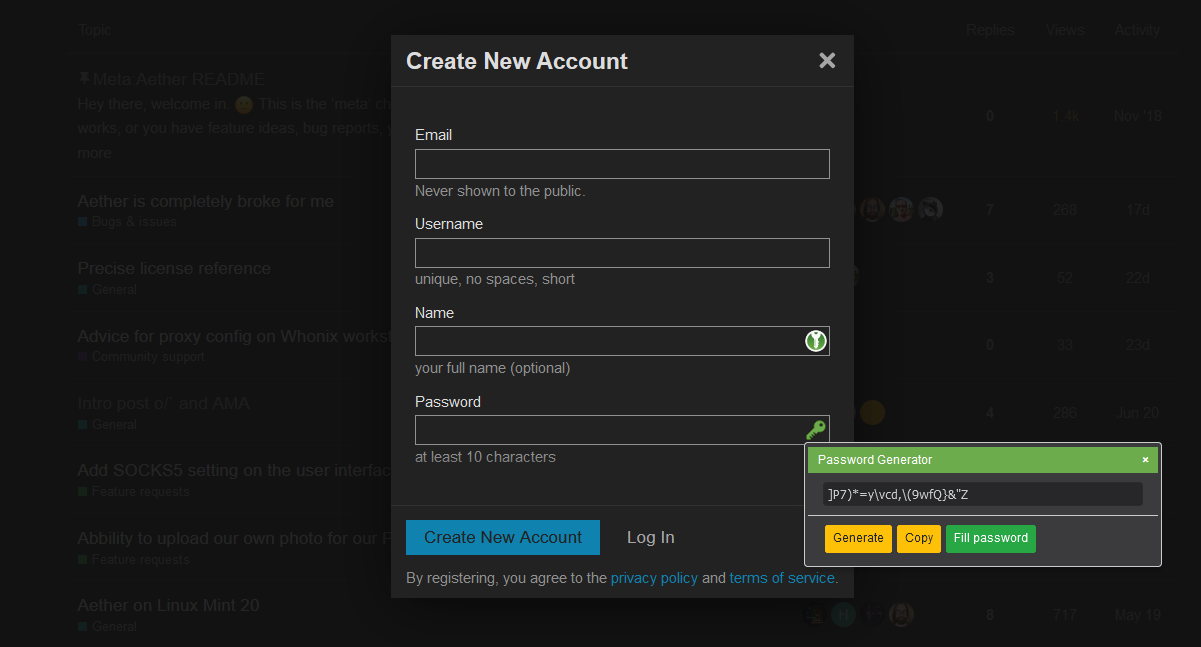
So here I am on a new website; it’s asking me to come up with a new password. After filling in my email address and preferred username, I click the green key icon in the password field, and the browser extension generates a password for me!
Click “Copy” to copy the password to your clipboard, then click “Fill password” to have the browser extension fill it into the password field. Then click “Create new account”. On the next screen, you should see a banner like this one:

KeePassXC shows this banner when it detects that you’re trying to create or update a password. Unfortunately this detection is not perfect; if KeePassXC misses a password, you’ll need to open the app and add it there (see below). (This is why we clicked “Copy” a minute ago – if KeePassXC neglected to capture the password and we didn’t have it on our clipboard, we’d need to go through the site’s password-reset process. Instead we can just open KeePassXC, click “New”, and paste the password in from our clipboard.)
Since the banner showed up, all we have to do is click the green “New” button and we’re done. KeePassXC automatically creates a new entry in our password vault with everything filled out. (If you’re changing a password for a site KeePass already knows about, click “Update” instead of “New”.)
Logging in
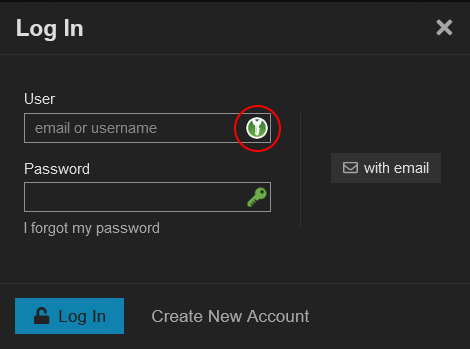
Now that you’ve added an entry to your password vault, logging into this site will be super easy. Just click the green password icon in the “User” field; KeePassXC will autofill your username and password. You can click “Log in” and be on your way.
Using the app directly
Creating a new password
If the browser extension misses a password, here’s how to add it to your vault. Open KeePassXC and click the New button in the toolbar (or press Ctrl-N).

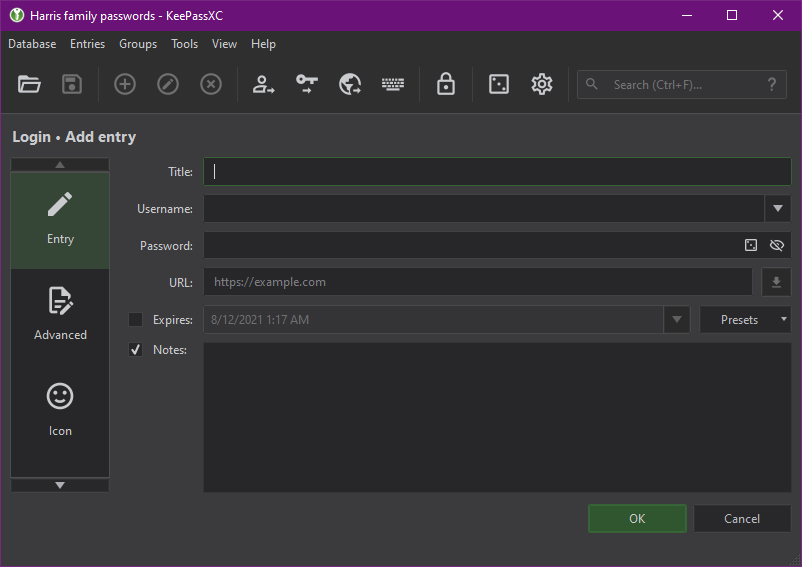
Fill in the form. All of the fields are optional. You can have KeePass generate a random password for you by clicking the the icon on the right side of the password field that looks like one of the dice from Monopoly. Don’t forget to fill in the URL field; KeePassXC needs that so it can autofill your password in the browser. When you’re done, click OK.
Logging in
Usually you’ll want to log into websites using the browser integration. If that doesn’t work for some reason, you can right-click an entry in your password vault and click “Copy Password”, then paste the password into the website.
KeePassXC also has an “Auto-Type” feature that will fill in your username and password together. Make sure your cursor is positioned in the “Username” field on the website you’re logging into; then switch to KeePass, right-click the entry in your password vault, and click “Perform Auto-Type” (or left-click it and press Ctrl-Shift-V). KeePass will switch to the other program, type in your username, then press Tab and type in your password.
Using the phone app
When you’re browsing the web on your phone, and you tap in a password field, you’ll get an autofill bubble above your keyboard, like so:
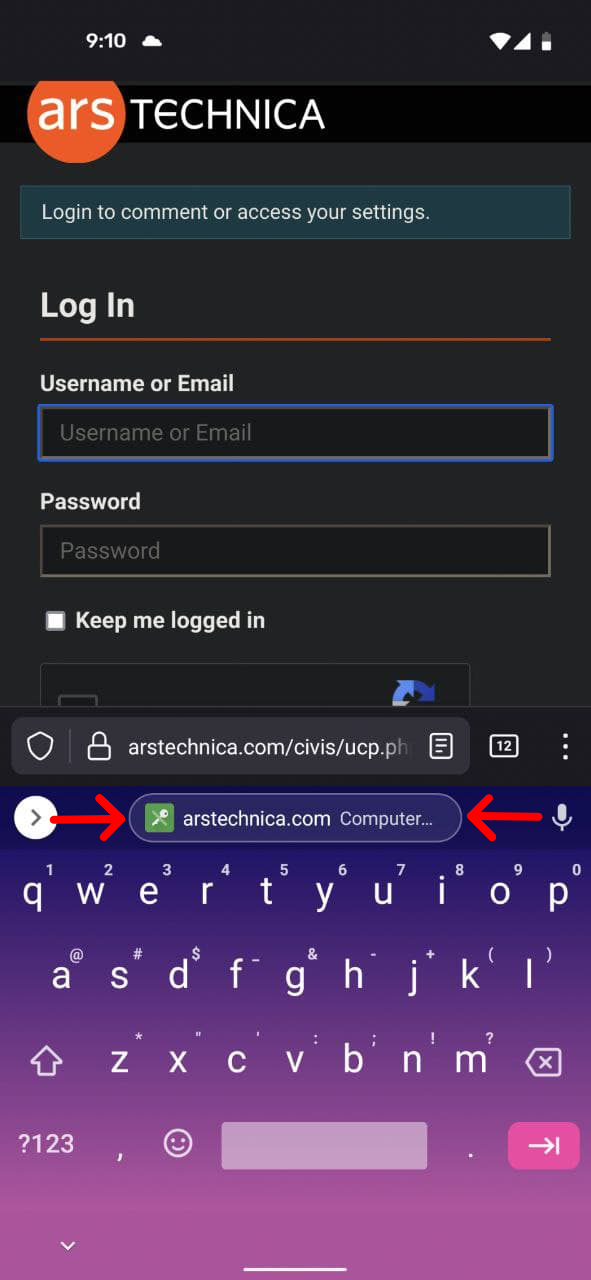
Tap the bubble and KeePassDX will autofill your username and password. Easy as that.
Conclusion
I know that’s a lot! If you’ve made it this far, I salute your dedication. You are now more secure than 99% of the people on the Internet. Your password vault will live from generation to generation of phones and computers, and you will save countless hours of resetting passwords and struggling to remember new ones. Congratulations!
I hope this guide was helpful; if you have any suggestions for how to improve it, please comment. Some parts of this felt like they might be easier to convey through a video; I prefer text over videos, but if you’d like to see a video of this, let me know. My next post will be about how to back up all the devices in your house cheaply, without requiring any effort after initial setup; expect that in a few weeks. Stay safe, everyone!